初识搜索引擎
1. query string search查询
1.1 search结果解析
1.1.1 search结果分析
1、我们如果发出一个搜索请求的话,会拿到一堆搜索结果,本节课,我们来讲解一下,这个搜索结果里的各种数据,都代表了什么含义
2、我们来讲解一下,搜索的timeout机制,底层的原理,画图讲解
GET /_search
{
    "took": 6,
    "timed_out": false,
    "_shards": {
        "total": 6,
        "successful": 6,
        "failed": 0
    },
    "hits": {
        "total": 10,
        "max_score": 1,
        "hits": [
            {
                "_index": ".kibana",
                "_type": "config",
                "_id": "5.2.0",
                "_score": 1,
                "_source": {
                    "buildNum": 14695
                }
            }
        ]
    }
}
- took:整个搜索请求花费了多少毫秒
- hits.total:本次搜索,返回了几条结果
- hits.max_score:本次搜索的所有结果中,最大的相关度分数是多少,每一条document对于search的相关度,越相关,_score分数越大,排位越靠前
- hits.hits:默认查询前10条数据,完整数据,_score降序排序
- shards:shards fail的条件(primary和replica全部挂掉),不影响其他shard。默认情况下来说,一个搜索请求,会打到一个index的所有primary shard上去,当然了,每个primary shard都可能会有一个或多个replic shard,所以请求也可以到primary shard的其中一个replica shard上去。
- timeout:默认无timeout,手动指定timeout,timeout查询执行机制
1.1.2 timeout机制
timeout=10ms,timeout=1s,timeout=1m
GET /_search?timeout=10m

1.2 multi index/type 搜索
1.2.1 多个index/type搜索
如何一次性搜索多个index和多个type下的数据:
/_search:所有索引,所有type下的所有数据都搜索出来/index1/_search:指定一个index,搜索其下所有type的数据/index1,index2/_search:同时搜索两个index下的数据/*1,*2/_search:按照通配符去匹配多个索引/index1/type1/_search:搜索一个index下指定的type的数据/index1/type1,type2/_search:可以搜索一个index下多个type的数据/index1,index2/type1,type2/_search:搜索多个index下的多个type的数据/_all/type1,type2/_search:_all,可以代表搜索所有index下的指定type的数据
1.2.2 搜索原理初步理解

1.3. 分页搜索
1.3.1 分页搜索语法
1、讲解如何使用es进行分页搜索的语法
size,from
GET /_search?size=10
GET /_search?size=10&from=0
GET /_search?size=10&from=20
分页的上机实验
GET /test_index/test_type/_search

"hits": {
    "total": 9,
    "max_score": 1,
    }
我们假设将这9条数据分成3页,每一页是3条数据,来实验一下这个分页搜索的效果
GET /test_index/test_type/_search?from=0&size=3
{
    "took": 2,
    "timed_out": false,
    "_shards": {
        "total": 5,
        "successful": 5,
        "failed": 0
    },
    "hits": {
        "total": 9,
        "max_score": 1,
        "hits": [
            {
                "_index": "test_index",
                "_type": "test_type",
                "_id": "8",
                "_score": 1,
                "_source": {
                    "test_field": "test client 2"
                }
            },
            {
                "_index": "test_index",
                "_type": "test_type",
                "_id": "6",
                "_score": 1,
                "_source": {
                    "test_field": "tes test"
                }
            },
            {
                "_index": "test_index",
                "_type": "test_type",
                "_id": "4",
                "_score": 1,
                "_source": {
                    "test_field": "test4"
                }
            }
        ]
    }
}
第一页:id=8,6,4
GET /test_index/test_type/_search?from=3&size=3
第二页:id=2,自动生成,7
GET /test_index/test_type/_search?from=6&size=3
第三页:id=1,11,3
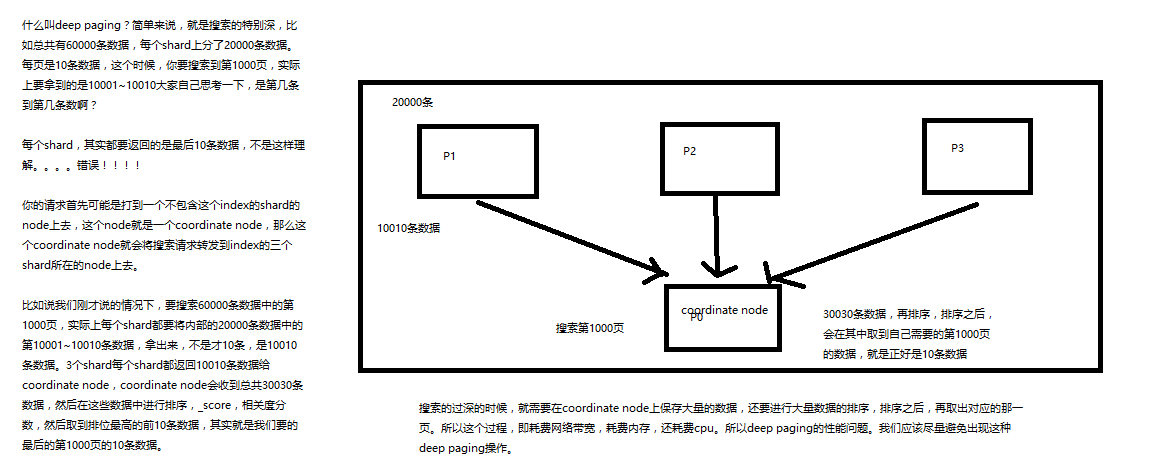
1.3.2 deep paging
什么是deep paging问题?为什么会产生这个问题,它的底层原理是什么?
deep paging性能问题,以及原理深度图解揭秘,很高级的知识点
1.4. query string和metadata
1.4.1 query string基础语法
GET /test_index/test_type/_search?q=test_field:test: 条件 test_field=testGET /test_index/test_type/_search?q=+test_field:test: 条件 test_field包含testGET /test_index/test_type/_search?q=-test_field:test: 条件 test_field不包含test
一个是掌握q=field:search content的语法,还有一个是掌握+和-的含义
1.4.2 _all metadata的原理和作用
GET /test_index/test_type/_search?q=test
直接可以搜索所有的field,任意一个field包含指定的关键字就可以搜索出来。我们在进行中搜索的时候,难道是对document中的每一个field都进行一次搜索吗?不是的
es中的_all元数据,在建立索引的时候,我们插入一条document,它里面包含了多个field,此时,es会自动将多个field的值,全部用字符串的方式串联起来,变成一个长的字符串,作为_all field的值,同时建立索引
后面如果在搜索的时候,没有对某个field指定搜索,就默认搜索_all field,其中是包含了所有field的值的
举个例子
{
  "name": "jack",
  "age": 26,
  "email": "jack@sina.com",
  "address": "guamgzhou"
}
"jack 26 jack@sina.com guangzhou",作为这一条document的 _all field 的值,同时进行分词后建立对应的倒排索引
1.5. 精确搜索和全文匹配
1.5.1 exact value
2017-01-01,exact value,搜索的时候,必须输入2017-01-01,才能搜索出来
如果你输入一个01,是搜索不出来的
1.5.2 full text
(1)缩写 vs 全称:cn vs china
(2)格式转化:like liked likes
(3)大小写:Tom vs tom
(4)同义词:like vs love
2017-01-01,2017 01 01,搜索2017,或者01,都可以搜索出来
china,搜索cn,也可以将china搜索出来
likes,搜索like,也可以将likes搜索出来
Tom,搜索tom,也可以将Tom搜索出来
like,搜索love,同义词,也可以将like搜索出来
就不是说单纯的只是匹配完整的一个值,而是可以对值进行拆分词语后(分词)进行匹配,也可以通过缩写、时态、大小写、同义词等进行匹配
2. 索引和分词
2.1 倒排索引
doc1:I really liked my small dogs, and I think my mom also liked them.
doc2:He never liked any dogs, so I hope that my mom will not expect me to liked him.
分词,初步的倒排索引的建立
| word | doc1 | doc2 |
|---|---|---|
| I | * | * |
| really | * | |
| liked | * | * |
| my | * | * |
| small | * | |
| dogs | * | |
| and | * | |
| think | * | |
| mom | * | * |
| also | * | |
| them | * | |
| He | * | |
| never | * | |
| any | * | |
| so | * | |
| hope | * | |
| that | * | |
| will | * | |
| not | * | |
| expect | * | |
| me | * | |
| to | * | |
| him | * |
演示了一下倒排索引最简单的建立的一个过程
搜索 mother like little dog,不可能有任何结果
mother
like
little
dog
这个是不是我们想要的搜索结果???绝对不是,因为在我们看来,mother和mom有区别吗?同义词,都是妈妈的意思。like和liked有区别吗?没有,都是喜欢的意思,只不过一个是现在时,一个是过去时。little和small有区别吗?同义词,都是小小的。dog和dogs有区别吗?狗,只不过一个是单数,一个是复数。
normalization,建立倒排索引的时候,会执行一个操作,也就是说对拆分出的各个单词进行相应的处理,以提升后面搜索的时候能够搜索到相关联的文档的概率
时态的转换,单复数的转换,同义词的转换,大小写的转换
mom —> mother
liked —> like
small —> little
dogs —> dog
重新建立倒排索引,加入normalization,再次用mother liked little dog搜索,就可以搜索到了
| word | doc1 | doc2 | |
|---|---|---|---|
| I | * | * | |
| really | * | ||
| liked | * | * | liked->like |
| my | * | * | |
| small | * | small->little | |
| dogs | * | dogs->dog | |
| and | * | ||
| think | * | ||
| mom | * | * | |
| also | * | ||
| them | * | ||
| He | * | ||
| never | * | ||
| any | * | ||
| so | * | ||
| hope | * | ||
| that | * | ||
| will | * | ||
| not | * | ||
| expect | * | ||
| me | * | ||
| to | * | ||
| him | * |
mother like little dog,分词,normalization
mother --> mom
like --> like
little --> little
dog --> dog
doc1和doc2都会搜索出来
doc1:I really liked my small dogs, and I think my mom also liked them.
doc2:He never liked any dogs, so I hope that my mom will not expect me to liked him.
2.2. 分词器
2.2.1 什么是分词器
切分词语,normalization(提升recall召回率)
给你一段句子,然后将这段句子拆分成一个一个的单个的单词,同时对每个单词进行normalization(时态转换,单复数转换),分词器
recall,召回率:搜索的时候,增加能够搜索到的结果的数量
character filter:在一段文本进行分词之前,先进行预处理,比如说最常见的就是,过滤html标签(hello --> hello),& --> and(I&you --> I and you)
tokenizer:分词,hello you and me --> hello, you, and, me
token filter:lowercase,stop word,synonymom,dogs --> dog,liked --> like,Tom --> tom,a/the/an --> 干掉,mother --> mom,small --> little
一个分词器,很重要,将一段文本进行各种处理,最后处理好的结果才会拿去建立倒排索引
2.2.2 内置分词器的介绍
Set the shape to semi-transparent by calling set_trans(5)
- standard analyzer:set, the, shape, to, semi, transparent, by, calling, set_trans, 5(默认的是standard)
- simple analyzer:set, the, shape, to, semi, transparent, by, calling, set, trans
- whitespace analyzer:Set, the, shape, to, semi-transparent, by, calling, set_trans(5)
- language analyzer(特定的语言的分词器,比如说,english,英语分词器):set, shape, semi, transpar, call, set_tran, 5
3. mapping解析
3.1 mapping案例
插入几条数据,让es自动为我们建立一个索引
PUT /website/article/1
{
  "post_date": "2017-01-01",
  "title": "my first article",
  "content": "this is my first article in this website",
  "author_id": 11400
}
PUT /website/article/2
{
  "post_date": "2017-01-02",
  "title": "my second article",
  "content": "this is my second article in this website",
  "author_id": 11400
}
PUT /website/article/3
{
  "post_date": "2017-01-03",
  "title": "my third article",
  "content": "this is my third article in this website",
  "author_id": 11400
}
尝试各种搜索
GET /website/article/_search?q=20173条结果GET /website/article/_search?q=2017-01-013条结果GET /website/article/_search?q=post_date:2017-01-011条结果GET /website/article/_search?q=post_date:20171条结果
查看es自动建立的mapping,带出什么是mapping的知识点
自动或手动为index中的type建立的一种数据结构和相关配置,简称为mapping
dynamic mapping,自动为我们建立index,创建type,以及type对应的mapping,mapping中包含了每个field对应的数据类型,以及如何分词等设置
我们当然,后面会讲解,也可以手动在创建数据之前,先创建index和type,以及type对应的mapping
查看mapping
GET /website/_mapping/article
{
    "website": {
        "mappings": {
            "article": {
                "properties": {
                    "author_id": {
                        "type": "long"
                    },
                    "content": {
                        "type": "text",
                        "fields": {
                            "keyword": {
                                "type": "keyword",
                                "ignore_above": 256
                            }
                        }
                    },
                    "post_date": {
                        "type": "date"
                    },
                    "title": {
                        "type": "text",
                        "fields": {
                            "keyword": {
                                "type": "keyword",
                                "ignore_above": 256
                            }
                        }
                    }
                }
            }
        }
    }
}
搜索结果为什么不一致,因为es自动建立mapping的时候,设置了不同的field不同的data type。不同的data type的分词、搜索等行为是不一样的。所以出现了_all field和post_date field的搜索表现完全不一样。
3.2 query string分词
query string必须以和index建立时相同的analyzer进行分词
query string对exact value和full text的区别对待
date:exact value
_all:full text
比如我们有一个document,其中有一个field,包含的value是:hello you and me,建立倒排索引
我们要搜索这个document对应的index,搜索文本是hell me,这个搜索文本就是query string
query string,默认情况下,es会使用它对应的field建立倒排索引时相同的分词器去进行分词,分词和normalization,只有这样,才能实现正确的搜索
我们建立倒排索引的时候,将dogs --> dog,结果你搜索的时候,还是一个dogs,那不就搜索不到了吗?所以搜索的时候,那个dogs也必须变成dog才行。才能搜索到。
知识点:不同类型的field,可能有的就是full text,有的就是exact value
post_date,date:exact value
_all:full text,分词,normalization
3.3 mapping案例问题分析
GET /_search?q=2017
搜索的是 _all field,document 所有的 field 都会拼接成一个大串,进行分词
2017-01-02 my second article this is my second article in this website 11400
| word | doc1 | doc2 | doc3 |
|---|---|---|---|
| 2017 | * | * | * |
| 01 | * | ||
| 02 | * | ||
| 03 | * |
_all,2017,自然会搜索到3个docuemnt
GET /_search?q=2017-01-01
_all,2017-01-01,query string 会用跟建立倒排索引一样的分词器去进行分词,分为 2017 01 两个词
| word | doc1 | doc2 | doc3 |
|---|---|---|---|
| 2017 | * | * | * |
| 01 | * | ||
| 02 | * | ||
| 03 | * |
GET /_search?q=post_date:2017-01-01
date,会作为exact value去建立索引
| word | doc1 | doc2 | doc3 |
|---|---|---|---|
| 2017-01-01 | * | ||
| 2017-01-02 | * | ||
| 2017-01-03 | * |
post_date:2017-01-01,2017-01-01,doc1一条document
GET /_search?q=post_date:2017,这个在这里不讲解,因为是es 5.2以后做的一个优化
3.4 测试分词器
GET /_analyze
{
  "analyzer": "standard",
  "text": "Text to analyze"
}
{
    "tokens": [
        {
            "token": "text",
            "start_offset": 0,
            "end_offset": 4,
            "type": "<ALPHANUM>",
            "position": 0
        },
        {
            "token": "to",
            "start_offset": 5,
            "end_offset": 7,
            "type": "<ALPHANUM>",
            "position": 1
        },
        {
            "token": "analyze",
            "start_offset": 8,
            "end_offset": 15,
            "type": "<ALPHANUM>",
            "position": 2
        }
    ]
}
3.5 mapping再理解
- 往es里面直接插入数据,es会自动建立索引,同时建立type以及对应的mapping
- mapping中就自动定义了每个field的数据类型
- 不同的数据类型(比如说text和date),可能有的是exact value,有的是full text
- exact value,在建立倒排索引的时候,分词的时候,是将整个值一起作为一个关键词建立到倒排索引中的;full text,会经历各种各样的处理,分词,normaliztion(时态转换,同义词转换,大小写转换),才会建立到倒排索引中
- 同时呢,exact value和full text类型的field就决定了,在一个搜索过来的时候,对exact value field或者是full text field进行搜索的行为也是不一样的,会跟建立倒排索引的行为保持一致;比如说exact value搜索的时候,就是直接按照整个值进行匹配,full text query string,也会进行分词和normalization再去倒排索引中去搜索
- 可以用es的dynamic mapping,让其自动建立mapping,包括自动设置数据类型;也可以提前手动创建index和type的mapping,自己对各个field进行设置,包括数据类型,包括索引行为,包括分词器,等等
mapping,就是index的type的元数据,每个type都有一个自己的mapping,决定了数据类型,建立倒排索引的行为,还有进行搜索的行为
3.6 mapping中类型
3.6.1 核心的数据类型
string
byte,short,integer,long
float,double
boolean
date
3.6.2 dynamic mapping
true or false --> boolean
123 --> long
123.45 --> double
2017-01-01 --> date
"hello world" --> string/text
3.6.3 查看mapping
GET /index/_mapping/type
3.7 自定义mapping
3.7.1 String分词
- analyzed:全文检索,分词 normalization,full_text
- not_analyzed:精确搜索,不分词,excat value
- no:不被检索到
3.7.2 修改mapping
只能创建index时手动建立mapping,或者新增field mapping,但是不能 update field mapping
新增 index 并定义好mapping
PUT /website
{
  "mappings": {
    "article": {
      "properties": {
        "author_id": {
          "type": "long"
        },
        "title": {
          "type": "text",
          "analyzer": "english"
        },
        "content": {
          "type": "text"
        },
        "post_date": {
          "type": "date"
        },
        "publisher_id": {
          "type": "text",
          // 不分词
          "index": "not_analyzed"
        }
      }
    }
  }
}
修改 author_id 的类型, long -> text
PUT /website
{
  "mappings": {
    "article": {
      "properties": {
        "author_id": {
          "type": "text"
        }
      }
    }
  }
}
报错,field mapping不能被修改
{
  "error": {
    "root_cause": [
      {
        "type": "index_already_exists_exception",
        "reason": "index [website/co1dgJ-uTYGBEEOOL8GsQQ] already exists",
        "index_uuid": "co1dgJ-uTYGBEEOOL8GsQQ",
        "index": "website"
      }
    ],
    "type": "index_already_exists_exception",
    "reason": "index [website/co1dgJ-uTYGBEEOOL8GsQQ] already exists",
    "index_uuid": "co1dgJ-uTYGBEEOOL8GsQQ",
    "index": "website"
  },
  "status": 400
}
新增field mapping
PUT /website/_mapping/article
{
  "properties" : {
    "new_field" : {
      "type" : "string",
      "index": "not_analyzed"
    }
  }
}
3.7.3 测试mapping
GET /website/_analyze
{
  "field": "content",
  "text": "my-dogs"
}
GET website/_analyze
{
  "field": "new_field",
  "text": "my dogs"
}
{
    "error": {
        "root_cause": [
            {
                "type": "remote_transport_exception",
                "reason": "[4onsTYV][127.0.0.1:9300][indices:admin/analyze[s]]"
            }
        ],
        "type": "illegal_argument_exception",
        "reason": "Can't process field [new_field], Analysis requests are only supported on tokenized fields"
    },
    "status": 400
}
3.8 mapping复杂数据类型
3.8.1 multivalue field
{ "tags": [ "tag1", "tag2" ]}
建立索引时与string是一样的,数据类型不能混
3.8.2 empty field
null,[],[null]
3.8.3 object field
PUT /company/employee/1
{
  "address": {
    "country": "china",
    "province": "guangdong",
    "city": "guangzhou"
  },
  "name": "jack",
  "age": 27,
  "join_date": "2017-01-01"
}
address:object类型
{
    "company": {
        "mappings": {
            "employee": {
                "properties": {
                    "address": {
                        "properties": {
                            "city": {
                                "type": "text",
                                "fields": {
                                    "keyword": {
                                        "type": "keyword",
                                        "ignore_above": 256
                                    }
                                }
                            },
                            "country": {
                                "type": "text",
                                "fields": {
                                    "keyword": {
                                        "type": "keyword",
                                        "ignore_above": 256
                                    }
                                }
                            },
                            "province": {
                                "type": "text",
                                "fields": {
                                    "keyword": {
                                        "type": "keyword",
                                        "ignore_above": 256
                                    }
                                }
                            }
                        }
                    },
                    "age": {
                        "type": "long"
                    },
                    "join_date": {
                        "type": "date"
                    },
                    "name": {
                        "type": "text",
                        "fields": {
                            "keyword": {
                                "type": "keyword",
                                "ignore_above": 256
                            }
                        }
                    }
                }
            }
        }
    }
}
底层存储结构,每一列存储到一起
{
  "address": {
    "country": "china",
    "province": "guangdong",
    "city": "guangzhou"
  },
  "name": "jack",
  "age": 27,
  "join_date": "2017-01-01"
}

{
    "name":            [jack],
    "age":          [27],
    "join_date":      [2017-01-01],
    "address.country":         [china],
    "address.province":   [guangdong],
    "address.city":  [guangzhou]
}
{
    "authors": [
        { "age": 26, "name": "Jack White"},
        { "age": 55, "name": "Tom Jones"},
        { "age": 39, "name": "Kitty Smith"}
    ]
}

{
    "authors.age":    [26, 55, 39],
    "authors.name":   [jack, white, tom, jones, kitty, smith]
}
4. Query DSL
4.1 什么是Query DSL
GET /_search
{
    "query": {
        "match_all": {}
    }
}
4.2 Query DSL的基本语法
{
    QUERY_NAME: {
        ARGUMENT: VALUE,
        ARGUMENT: VALUE,...
    }
}
{
    QUERY_NAME: {
        FIELD_NAME: {
            ARGUMENT: VALUE,
            ARGUMENT: VALUE,...
        }
    }
}
示例:
GET /test_index/test_type/_search
{
  "query": {
    "match": {
      "test_field": "test"
    }
  }
}
4.3 如何组合多个搜索条件
搜索需求:title必须包含elasticsearch,content可以包含elasticsearch也可以不包含,author_id必须不为111
GET /website/article/_search
{
  "query": {
    "bool": {
      "must": [
        {
          "match": {
            "title": "elasticsearch"
          }
        }
      ],
      "should": [
        {
          "match": {
            "content": "elasticsearch"
          }
        }
      ],
      "must_not": [
        {
          "match": {
            "author_id": 111
          }
        }
      ]
    }
  }
}
搜索需求:name包含tom,hired为weitrue、personality为good、rude不为true 三个条件至少要满足一个
GET /test_index/_search
{
    "query": {
            "bool": {
                "must": { "match":   { "name": "tom" }},
                "should": [
                    { "match":       { "hired": true }},
                    { "bool": {
                        "must":      { "match": { "personality": "good" }},
                        "must_not":  { "match": { "rude": true }}
                    }}
                ],
                "minimum_should_match": 1
            }
    }
}
4.4 filter和query区别
4.4.1 filter与query示例
PUT /company/employee/2
{
  "address": {
    "country": "china",
    "province": "jiangsu",
    "city": "nanjing"
  },
  "name": "tom",
  "age": 30,
  "join_date": "2016-01-01"
}
PUT /company/employee/3
{
  "address": {
    "country": "china",
    "province": "shanxi",
    "city": "xian"
  },
  "name": "marry",
  "age": 35,
  "join_date": "2015-01-01"
}
搜索请求:年龄必须大于等于30,同时join_date必须是2016-01-01
GET /company/employee/_search
{
  "query": {
    "bool": {
      "must": [
        {
          "match": {
            "join_date": "2016-01-01"
          }
        }
      ],
      "filter": {
        "range": {
          "age": {
            "gte": 30
          }
        }
      }
    }
  }
}
4.4.2 filter与query对比
- filter,仅仅只是按照搜索条件过滤出需要的数据而已,不计算任何相关度分数,对相关度没有任何影响
- query,会去计算每个document相对于搜索条件的相关度,并按照相关度进行排序
一般来说,如果你是在进行搜索,需要将最匹配搜索条件的数据先返回,那么用query;如果你只是要根据一些条件筛选出一部分数据,不关注其排序,那么用filter
除非是你的这些搜索条件,你希望越符合这些搜索条件的document越排在前面返回,那么这些搜索条件要放在query中;如果你不希望一些搜索条件来影响你的document排序,那么就放在filter中即可
3、filter与query性能
- filter,不需要计算相关度分数,不需要按照相关度分数进行排序,同时还有内置的自动cache最常使用filter的数据
- query,相反,要计算相关度分数,按照分数进行排序,而且无法cache结果
4.5. query搜索语法
4.5.1 基础语法
match all
GET /_search
{
    "query": {
        "match_all": {}
    }
}
match
GET /_search
{
    "query": { "match": { "title": "my elasticsearch article" }}
}
multi match
GET /test_index/test_type/_search
{
    "query": {
        "multi_match": {
            "query": "test",
            "fields": ["test_field", "test_field1"]
        }
    }
}
range query
GET /company/employee/_search
{
    "query": {
        "range": {
            "age": {
                "gte": 30
            }
        }
    }
}
term query
GET /test_index/test_type/_search
{
    "query": {
        "term": {
        	"test_field": "test hello"
        }
    }
}
terms query
GET /_search
{
    "query": { "terms": { "tag": [ "search", "full_text", "nosql" ] }}
}
exist query(2.x中的查询,现在已经不提供了)
4.5.2 组合搜索语法
GET /website/article/_search
{
  "query": {
    "bool": {
      "must": [
        {
          "match": {
            "title": "elasticsearch"
          }
        }
      ],
      "should": [
        {
          "match": {
            "content": "elasticsearch"
          }
        }
      ],
      "must_not": [
        {
          "match": {
            "author_id": 111
          }
        }
      ]
    }
  }
}
bool下面可以有四种判断
bool
must,must_not,should,filter
{
    "bool": {
        "must":     { "match": { "title": "how to make millions" }},
        "must_not": { "match": { "tag":   "spam" }},
        "should": [
            { "match": { "tag": "starred" }}
        ],
        "filter": {
          "range": { "date": { "gte": "2014-01-01" }}
        }
    }
}
每个子查询都会计算一个document针对它的相关度分数,然后bool综合所有分数,合并为一个分数,当然filter是不会计算分数的
复杂bool查询
{
    "bool": {
        "must":     { "match": { "title": "how to make millions" }},
        "must_not": { "match": { "tag":   "spam" }},
        "should": [
            { "match": { "tag": "starred" }}
        ],
        "filter": {
          "bool": {
              "must": [
                  { "range": { "date": { "gte": "2014-01-01" }}},
                  { "range": { "price": { "lte": 29.99 }}}
              ],
              "must_not": [
                  { "term": { "category": "ebooks" }}
              ]
          }
        }
    }
}
只有一个过滤条件,可使用如下方式:
GET /company/employee/_search
{
  "query": {
    "constant_score": {
      "filter": {
        "range": {
          "age": {
            "gte": 30
          }
        }
      }
    }
  }
}
4.6 搜索排序
4.6.1 默认排序规则
默认情况下,是按照_score降序排序的
然而,某些情况下,可能没有有用的_score,比如说filter
GET /_search
{
    "query" : {
        "bool" : {
            "filter" : {
                "term" : {
                    "author_id" : 1
                }
            }
        }
    }
}
当然,也可以是constant_score
GET /_search
{
    "query" : {
        "constant_score" : {
            "filter" : {
                "term" : {
                    "author_id" : 1
                }
            }
        }
    }
}
4.6.2 定制排序规则
GET /company/employee/_search
{
  "query": {
    "constant_score": {
      "filter": {
        "range": {
          "age": {
            "gte": 30
          }
        }
      }
    }
  },
  "sort": [
    {
      "join_date": {
        "order": "asc"
      }
    }
  ]
}
4.7 字符串排序
如果对一个string field进行排序,结果往往不准确,因为分词后是多个单词,再排序就不是我们想要的结果了
通常解决方案是,将一个string field建立两次索引,一个分词,用来进行搜索;一个不分词,用来进行排序
修改 website 的 mapping
PUT /website
{
  "mappings": {
    "article": {
      "properties": {
        "title": {
          "type": "text",
          "fields": {
            "raw": {
              "type": "string",
              "index": "not_analyzed"
            }
          },
          "fielddata": true
        },
        "content": {
          "type": "text"
        },
        "post_date": {
          "type": "date"
        },
        "author_id": {
          "type": "long"
        }
      }
    }
  }
}
使用分词后的 title 字段进行排序
GET /website/article/_search
{
  "query": {
    "match_all": {}
  },
  "sort": [
    {
      "title": {
        "order": "desc"
      }
    }
  ]
}
使用未分词的 title 字段进行排序
GET /website/article/_search
{
  "query": {
    "match_all": {}
  },
  "sort": [
    {
      "title.raw": {
        "order": "desc"
      }
    }
  ]
}
5. TF/IDF算法
5.1 算法介绍
relevance score算法,简单来说,就是计算出,一个索引中的文本,与搜索文本,他们之间的关联匹配程度
Elasticsearch使用的是 term frequency/inverse document frequency 算法,简称为TF/IDF算法
Term frequency:搜索文本中的各个词条在field文本中出现了多少次,出现次数越多,就越相关
搜索请求:hello world
doc1:hello you, and world is very good (更相关)
doc2:hello, how are youInverse document frequency:搜索文本中的各个词条在整个索引的所有文档中出现了多少次,出现的次数越多,就越不相关
搜索请求:hello world
doc1:hello, today is very good
doc2:hi world, how are you比如说,在index中有1万条document,hello这个单词在所有的document中,一共出现了1000次;world这个单词在所有的document中,一共出现了100次
doc2更相关
Field-length norm:field长度,field越长,相关度越弱
搜索请求:hello world
doc1:{ "title": "hello article", "content": "babaaba 1万个单词" }
doc2:{ "title": "my article", "content": "blablabala 1万个单词,hi world" }hello world在整个index中出现的次数是一样多的
doc1更相关,title field更短
5.2 _score如何被计算出来的
GET /test_index/test_type/_search?explain
{
  "query": {
    "match": {
      "test_field": "test hello"
    }
  }
}
查询结果(去掉了部分重复数据,只保留了主要结构)
{
  "took": 6,
  "timed_out": false,
  "_shards": {
    "total": 5,
    "successful": 5,
    "failed": 0
  },
  "hits": {
    "total": 4,
    "max_score": 1.595089,
    "hits": [
      {
        "_shard": "[test_index][2]",
        "_node": "4onsTYVZTjGvIj9_spWz2w",
        "_index": "test_index",
        "_type": "test_type",
        "_id": "20",
        "_score": 1.595089,
        "_source": {
          "test_field": "test hello"
        },
        "_explanation": {
          "value": 1.595089,
          "description": "sum of:",
          "details": [
            {
              "value": 1.595089,
              "description": "sum of:",
              "details": [
                {
                  "value": 0.58279467,
                  "description": "weight(test_field:test in 0) [PerFieldSimilarity], result of:",
                  "details": [
                    {
                      "value": 0.58279467,
                      "description": "score(doc=0,freq=1.0 = termFreq=1.0\n), product of:",
                      "details": [
                        {
                          "value": 0.6931472,
                          "description": "idf, computed as log(1 + (docCount - docFreq + 0.5) / (docFreq + 0.5)) from:",
                          "details": [
                            {
                              "value": 2,
                              "description": "docFreq",
                              "details": []
                            },
                            {
                              "value": 4,
                              "description": "docCount",
                              "details": []
                            }
                          ]
                        }
                      ]
                    }
                  ]
                }
              ]
            }
          ]
        }
      }
    ]
  }
}
3、document如何匹配的
GET /test_index/test_type/6/_explain
{
  "query": {
    "match": {
      "test_field": "test hello"
    }
  }
}
6. 查询解析
6.1 查询流程
一般分为2个阶段 query phase + fetch phase
6.1.1 query phase
- 搜索请求发送到某一个coordinate node,构构建一个priority queue,长度以paging操作from和size为准,默认为10
- coordinate node将请求转发到所有shard,每个shard本地搜索,并构建一个本地的priority queue
- 各个shard将自己的priority queue返回给coordinate node,并构建一个全局的priority queue
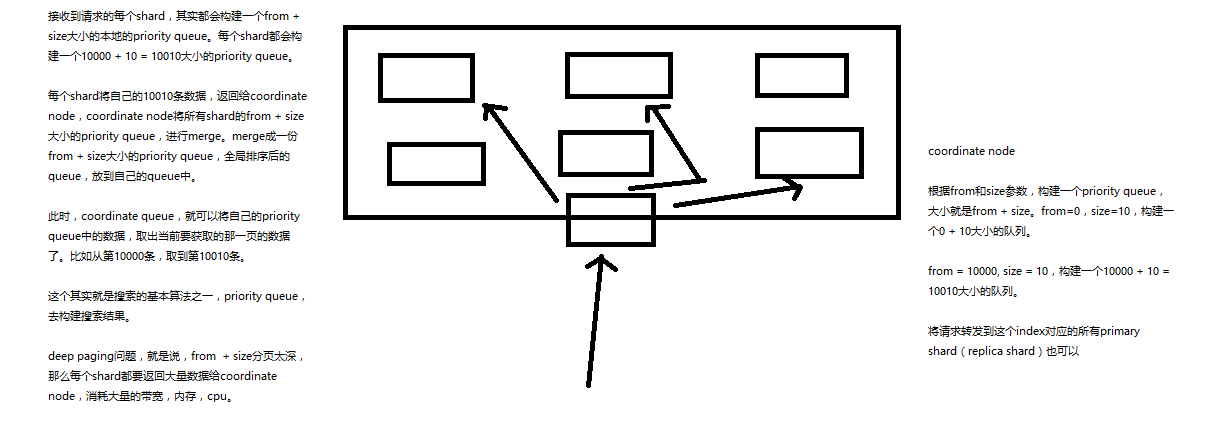
replica shard如何提升搜索吞吐量
一次请求要打到所有shard的一个replica/primary上去,如果每个shard都有多个replica,那么同时并发过来的搜索请求可以同时打到其他的replica上去
6.1.2 fetch phbase
- coordinate node构建完priority queue之后,就发送mget请求去所有shard上获取对应的document
- 各个shard将document返回给coordinate node
- coordinate node将合并后的document结果返回给client客户端

一般搜索,如果不加from和size,就默认搜索前10条,按照 _score 排序
6.2 查询参数说明
6.2.1 preference
决定了哪些shard会被用来执行搜索操作
_primary, _primary_first, _local, _only_node:xyz, _prefer_node:xyz, _shards:2,3
bouncing results问题,两个document排序,field值相同;不同的shard上,可能排序不同;每次请求轮询打到不同的replica shard上;每次页面上看到的搜索结果的排序都不一样。这就是bouncing result,也就是跳跃的结果。
搜索的时候,是轮询将搜索请求发送到每一个replica shard(primary shard),但是在不同的shard上,可能document的排序不同
解决方案就是将preference设置为一个字符串,比如说user_id,让每个user每次搜索的时候,都使用同一个replica shard去执行,就不会看到bouncing results了
6.2.2 timeout
已经讲解过原理了,主要就是限定在一定时间内,将部分获取到的数据直接返回,避免查询耗时过长
6.2.3 routing
document文档路由,_id路由,routing=user_id,这样的话可以让同一个user对应的数据到一个shard上去
6.2.4 search_type
default:query_then_fetch
dfs_query_then_fetch,可以提升revelance sort精准度
6.3 scroll滚动搜索
如果一次性要查出来比如10万条数据,那么性能会很差,此时一般会采取用scoll滚动查询,一批一批的查,直到所有数据都查询完处理完
使用scoll滚动搜索,可以先搜索一批数据,然后下次再搜索一批数据,以此类推,直到搜索出全部的数据来
scoll搜索会在第一次搜索的时候,保存一个当时的视图快照,之后只会基于该旧的视图快照提供数据搜索,如果这个期间数据变更,是不会让用户看到的
采用基于_doc进行排序的方式,性能较高
每次发送scroll请求,我们还需要指定一个scoll参数,指定一个时间窗口,每次搜索请求只要在这个时间窗口内能完成就可以了
GET /test_index/test_type/_search?scroll=1m
{
  "query": {
    "match_all": {}
  },
  "sort": [ "_doc" ],
  "size": 3
}
{
  "_scroll_id": "DnF1ZXJ5VGhlbkZldGNoBQAAAAAAACxeFjRvbnNUWVZaVGpHdklqOV9zcFd6MncAAAAAAAAsYBY0b25zVFlWWlRqR3ZJajlfc3BXejJ3AAAAAAAALF8WNG9uc1RZVlpUakd2SWo5X3NwV3oydwAAAAAAACxhFjRvbnNUWVZaVGpHdklqOV9zcFd6MncAAAAAAAAsYhY0b25zVFlWWlRqR3ZJajlfc3BXejJ3",
  "took": 5,
  "timed_out": false,
  "_shards": {
    "total": 5,
    "successful": 5,
    "failed": 0
  },
  "hits": {
    "total": 10,
    "max_score": null,
    "hits": [
      {
        "_index": "test_index",
        "_type": "test_type",
        "_id": "8",
        "_score": null,
        "_source": {
          "test_field": "test client 2"
        },
        "sort": [
          0
        ]
      },
      {
        "_index": "test_index",
        "_type": "test_type",
        "_id": "6",
        "_score": null,
        "_source": {
          "test_field": "tes test"
        },
        "sort": [
          0
        ]
      },
      {
        "_index": "test_index",
        "_type": "test_type",
        "_id": "AVp4RN0bhjxldOOnBxaE",
        "_score": null,
        "_source": {
          "test_content": "my test"
        },
        "sort": [
          0
        ]
      }
    ]
  }
}
获得的结果会有一个scoll_id,下一次再发送scoll请求的时候,必须带上这个scoll_id
GET /_search/scroll
{
    "scroll": "1m",
    "scroll_id" : "DnF1ZXJ5VGhlbkZldGNoBQAAAAAAACxeFjRvbnNUWVZaVGpHdklqOV9zcFd6MncAAAAAAAAsYBY0b25zVFlWWlRqR3ZJajlfc3BXejJ3AAAAAAAALF8WNG9uc1RZVlpUakd2SWo5X3NwV3oydwAAAAAAACxhFjRvbnNUWVZaVGpHdklqOV9zcFd6MncAAAAAAAAsYhY0b25zVFlWWlRqR3ZJajlfc3BXejJ3"
}
11,4,7
3,2,1
20
scoll,看起来挺像分页的,但是其实使用场景不一样。分页主要是用来一页一页搜索,给用户看的;scoll主要是用来一批一批检索数据,让系统进行处理的
6.4 索引增删改
6.4.1 创建索引
创建索引的语法
PUT /my_index
{
    "settings": { ... any settings ... },
    "mappings": {
        "type_one": { ... any mappings ... },
        "type_two": { ... any mappings ... },
        ...
    }
}
创建索引的示例
PUT /my_index
{
  "settings": {
    "number_of_shards": 1,
    "number_of_replicas": 0
  },
  "mappings": {
    "my_type": {
      "properties": {
        "my_field": {
          "type": "text"
        }
      }
    }
  }
}
6.4.2 修改索引
PUT /my_index/_settings
{
    "number_of_replicas": 1
}
6.4.3 删除索引
DELETE /my_index
DELETE /index_one,index_two
DELETE /index_*
DELETE /_all
elasticsearch.yml
action.destructive_requires_name: true
6.5 分词器修改
6.5.1 默认的分词器
standard
- standard tokenizer:以单词边界进行切分
- standard token filter:什么都不做
- lowercase token filter:将所有字母转换为小写
- stop token filer(默认被禁用):移除停用词,比如a the it等等
6.5.2 修改分词器的设置
启用english停用词token filter
PUT /my_index
{
  "settings": {
    "analysis": {
      "analyzer": {
        "es_std": {
          "type": "standard",
          "stopwords": "_english_"
        }
      }
    }
  }
}
测试 standard 分词器
GET /my_index/_analyze
{
  "analyzer": "standard",
  "text": "a dog is in the house"
}
测试自定义 es_std 分词器
GET /my_index/_analyze
{
  "analyzer": "es_std",
  "text":"a dog is in the house"
}
6.5.3 定制化自己的分词器
PUT /my_index
{
  "settings": {
    "analysis": {
      "char_filter": {
        // & 转成 and
        "&_to_and": {
          "type": "mapping",
          "mappings": ["&=> and"]
        }
      },
      "filter": {
        // 去掉停用词, the a
        "my_stopwords": {
          "type": "stop",
          "stopwords": ["the", "a"]
        }
      },
      "analyzer": {
        // 自定义分词器,启用前面的 filter
        "my_analyzer": {
          "type": "custom",
          "char_filter": ["html_strip", "&_to_and"],
          "tokenizer": "standard",
          "filter": ["lowercase", "my_stopwords"]
        }
      }
    }
  }
}
测试 my_analyzer 分词器
GET /my_index/_analyze
{
  "text": "tom&jerry are a friend in the house, <a>, HAHA!!",
  "analyzer": "my_analyzer"
}
在 my_index 索引中使用自定义分词器
PUT /my_index/_mapping/my_type
{
  "properties": {
    "content": {
      "type": "text",
      "analyzer": "my_analyzer"
    }
  }
}
6.6 type的存储
type,是一个index中用来区分类似的数据的,类似的数据,但是可能有不同的fields,而且有不同的属性来控制索引建立、分词器
field的value,在底层的lucene中建立索引的时候,全部是opaque bytes类型,不区分类型的
lucene是没有type的概念的,在document中,实际上将type作为一个document的field来存储,即 _type,es通过 _type 来进行 type 的过滤和筛选
一个index中的多个type,实际上是放在一起存储的,因此一个index下,不能有多个type重名,而类型或者其他设置不同的,因为那样是无法处理的
{
   "ecommerce": {
      "mappings": {
         "elactronic_goods": {
            "properties": {
               "name": {
                  "type": "string",
               },
               "price": {
                  "type": "double"
               },
	       "service_period": {
		  "type": "string"
	       }
            }
         },
         "fresh_goods": {
            "properties": {
               "name": {
                  "type": "string",
               },
               "price": {
                  "type": "double"
               },
	       "eat_period": {
		  "type": "string"
	       }
            }
         }
      }
   }
}
{
  "name": "geli kongtiao",
  "price": 1999.0,
  "service_period": "one year"
}

{
  "name": "aozhou dalongxia",
  "price": 199.0,
  "eat_period": "one week"
}
在底层的存储是这样子的。。。。
{
   "ecommerce": {
      "mappings": {
        "_type": {
          "type": "string",
          "index": "not_analyzed"
        },
        "name": {
          "type": "string"
        }
        "price": {
          "type": "double"
        }
        "service_period": {
          "type": "string"
        }
        "eat_period": {
          "type": "string"
        }
      }
   }
}
{
  "_type": "elactronic_goods",
  "name": "geli kongtiao",
  "price": 1999.0,
  "service_period": "one year",
  "eat_period": ""
}

{
  "_type": "fresh_goods",
  "name": "aozhou dalongxia",
  "price": 199.0,
  "service_period": "",
  "eat_period": "one week"
}
最佳实践,将类似结构的type放在一个index下,这些type应该有多个field是相同的
假如说,你将两个type的field完全不同,放在一个index下,那么就每条数据都至少有一半的field在底层的lucene中是空值,会有严重的性能问题
6.7 mapping root object
6.7.1 root object
就是某个type对应的mapping json,包括了properties,metadata(_id,_source,_type),settings(analyzer),其他settings(比如include_in_all)
PUT /my_index
{
  "mappings": {
    "my_type": {
      "properties": {}
    }
  }
}
6.7.2 properties
type,index,analyzer
PUT /my_index/_mapping/my_type
{
  "properties": {
    "title": {
      "type": "text"
    }
  }
}
6.7.3 _source
好处
- 查询的时候,直接可以拿到完整的document,不需要先拿document id,再发送一次请求拿document
- partial update基于_source实现
- reindex时,直接基于_source实现,不需要从数据库(或者其他外部存储)查询数据再修改
- 可以基于_source定制返回field
- debug query更容易,因为可以直接看到_source
如果不需要上述好处,可以禁用_source
PUT /my_index/_mapping/my_type2
{
  "_source": {"enabled": false}
}
6.7.4 _all
将所有field打包在一起,作为一个_all field,建立索引。没指定任何field进行搜索时,就是使用_all field在搜索。
PUT /my_index/_mapping/my_type3
{
  "_all": {"enabled": false}
}
也可以在field级别设置include_in_all field,设置是否要将field的值包含在_all field中
PUT /my_index/_mapping/my_type4
{
  "properties": {
    "my_field": {
      "type": "text",
      "include_in_all": false
    }
  }
}
6.7.5 标识性metadata
_index,_type,_id