Spring IOC分析
Spring 核心之 IOC 容器初体验
再谈 IOC 与 DI
IOC(Inversion of Control)控制反转:所谓控制反转,就是把原先我们代码里面需要实现的对象创建、依赖的代码,反转给容器来帮忙实现。那么必然的我们需要创建一个容器,同时需要一种描述来让容器知道需要创建的对象与对象的关系。这个描述最具体表现就是我们所看到的配置文件。
DI(Dependency Injection)依赖注入:就是指对象是被动接受依赖类而不是自己主动去找,换句话说就是指对象不是从容器中查找它依赖的类,而是在容器实例化对象的时候主动将它依赖的类注入给它。
先从我们自己设计这样一个视角来考虑:
- 对象和对象的关系怎么表示?
可以用 xml,properties 文件等语义化配置文件表示。 - 描述对象关系的文件存放在哪里?
可能是 classpath,filesystem,或者是 URL 网络资源,servletContext 等。
回到正题,有了配置文件,还需要对配置文件解析。 - 不同的配置文件对对象的描述不一样,如标准的,自定义声明式的,如何统一?
在内部需要有一个统一的关于对象的定义,所有外部的描述都必须转化成统一的描述定义。 - 如何对不同的配置文件进行解析?
需要对不同的配置文件语法,采用不同的解析器。
Spring 核心容器类图
1、BeanFactory
Spring Bean 的创建是典型的工厂模式,这一系列的 Bean 工厂,也即 IOC 容器为开发者管理对象间的依赖关系提供了很多便利和基础服务,在 Spring 中有许多的 IOC 容器的实现供用户选择和使用,其相互关系如下:
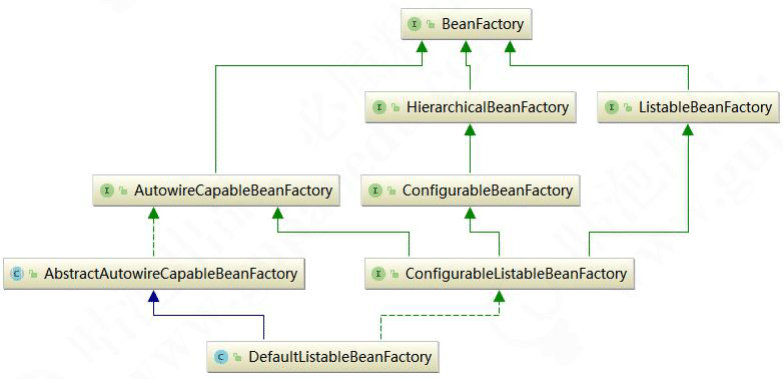
其中 BeanFactory 作为最顶层的一个接口类,它定义了 IOC 容器的基本功能规范,BeanFactory 有三个重要的子类:ListableBeanFactory、HierarchicalBeanFactory 和 AutowireCapableBeanFactory。
但是从类图中我们可以发现最终的默认实现类是 DefaultListableBeanFactory,它实现了所有的接口。
那为何要定义这么多层次的接口呢?查阅这些接口的源码和说明发现,每个接口都有它使用的场合,它主要是为了区分在 Spring 内部在操作过程中对象的传递和转化过程时,对对象的数据访问所做的限制。例如 ListableBeanFactory 接口表示这些 Bean 是可列表化的,而 HierarchicalBeanFactory 表示的是这些 Bean 是有继承关系的,也就是每个 Bean 有可能有父 Bean。AutowireCapableBeanFactory 接口定义 Bean 的自动装配规则。这三个接口共同定义了 Bean 的集合、Bean 之间的关系、以及 Bean 行为。最基本的 IOC 容器接口 BeanFactory,来看一下它的源码:
public interface BeanFactory {

    //对 FactoryBean 的转义定义,因为如果使用 bean 的名字检索 FactoryBean 得到的对象是工厂生成的对象,

    //如果需要得到工厂本身,需要转义
    String FACTORY_BEAN_PREFIX = "&";

    //根据 bean 的名字,获取在 IOC 容器中得到 bean 实例
    Object getBean(String name) throws BeansException;

    //根据 bean 的名字和 Class 类型来得到 bean 实例,增加了类型安全验证机制。
    <T> T getBean(String name, @Nullable Class<T> requiredType) throws BeansException;

    Object getBean(String name, Object... args) throws BeansException;
    <T> T getBean(Class<T> requiredType) throws BeansException;
    <T> T getBean(Class<T> requiredType, Object... args) throws BeansException;

    //提供对 bean 的检索,看看是否在 IOC 容器有这个名字的 bean
    boolean containsBean(String name);

    //根据 bean 名字得到 bean 实例,并同时判断这个 bean 是不是单例
    boolean isSingleton(String name) throws NoSuchBeanDefinitionException;
    boolean isPrototype(String name) throws NoSuchBeanDefinitionException;
    boolean isTypeMatch(String name, ResolvableType typeToMatch) throws
        NoSuchBeanDefinitionException;
    boolean isTypeMatch(String name, @Nullable Class<?> typeToMatch) throws
        NoSuchBeanDefinitionException;

    //得到 bean 实例的 Class 类型
    @Nullable
    Class<?> getType(String name) throws NoSuchBeanDefinitionException;

    //得到 bean 的别名,如果根据别名检索,那么其原名也会被检索出来
    String[] getAliases(String name);
}
在 BeanFactory 里只对 IOC 容器的基本行为作了定义,根本不关心你的 Bean 是如何定义怎样加载的。正如我们只关心工厂里得到什么的产品对象,至于工厂是怎么生产这些对象的,这个基本的接口不关心。
而要知道工厂是如何产生对象的,我们需要看具体的 IOC 容器实现,Spring 提供了许多 IOC 容器的实现 。 比如 GenericApplicationContext, ClasspathXmlApplicationContext 等 。
ApplicationContext 是 Spring 提供的一个高级的 IOC 容器,它除了能够提供 IOC 容器的基本功能外,还为用户提供了以下的附加服务。从 ApplicationContext 接口的实现,我们看出其特点:
- 支持信息源,可以实现国际化。(实现 MessageSource 接口)
- 访问资源。(实现 ResourcePatternResolver 接口,后面章节会讲到)
- 支持应用事件。(实现 ApplicationEventPublisher 接口)
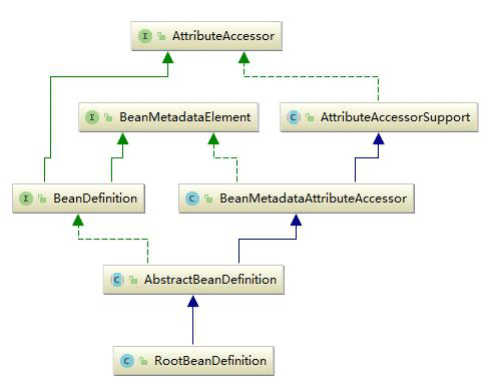
2、BeanDefinition
SpringIOC 容器管理了我们定义的各种 Bean 对象及其相互的关系,Bean 对象在 Spring 实现中是以 BeanDefinition 来描述的,其继承体系如下:
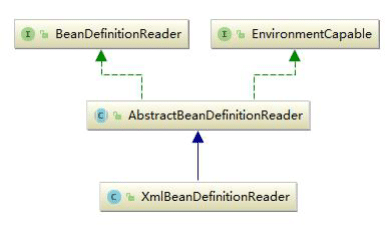
3、BeanDefinitionReader
Bean 的解析过程非常复杂,功能被分的很细,因为这里需要被扩展的地方很多,必须保证有足够的灵活性,以应对可能的变化。Bean 的解析主要就是对 Spring 配置文件的解析。这个解析过程主要通过 BeanDefintionReader 来完成,最后看看 Spring 中 BeanDefintionReader 的类结构图:
通过本章内容的分析,我们对 Spring 框架体系有了一个基本的宏观了解,希望小伙伴们好好理解,最好在脑海中形成画面,为以后的学习打下良好的铺垫。
Web IOC 容器初体验
我们还是从大家最熟悉的 DispatcherServlet 开始,我们最先想到的还是 DispatcherServlet 的 init() 方法。我们发现在 DispatherServlet 中并没有找到 init()方法。但是经过探索,往上追索在其父类HttpServletBean 中找到了我们想要的 init()方法,如下:
/**
* Map config parameters onto bean properties of this servlet, and
* invoke subclass initialization.
* @throws ServletException if bean properties are invalid (or required
* properties are missing), or if subclass initialization fails.
*/
@Override
public final void init() throws ServletException {
    if (logger.isDebugEnabled()) {
        logger.debug("Initializing servlet '" + getServletName() + "'");
    }

    // Set bean properties from init parameters.
    PropertyValues pvs = new ServletConfigPropertyValues(getServletConfig(),
                                                         this.requiredProperties);
    if (!pvs.isEmpty()) {
        try {
            //定位资源
            BeanWrapper bw = PropertyAccessorFactory.forBeanPropertyAccess(this);
            //加载配置信息
            ResourceLoader resourceLoader = new ServletContextResourceLoader(getServletContext());
            bw.registerCustomEditor(Resource.class, new ResourceEditor(resourceLoader, getEnvironment()));
            initBeanWrapper(bw);
            bw.setPropertyValues(pvs, true);
        }
        catch (BeansException ex) {
            if (logger.isErrorEnabled()) {
                logger.error("Failed to set bean properties on servlet '" + getServletName() + "'", ex);
            }
            throw ex;
        }
    }

    // Let subclasses do whatever initialization they like.
    initServletBean();

    if (logger.isDebugEnabled()) {
        logger.debug("Servlet '" + getServletName() + "' configured successfully");
    }
}
在 init()方法中,真正完成初始化容器动作的逻辑其实在 initServletBean()方法中,我们继续跟进initServletBean()中的代码在 FrameworkServlet 类中:
/**
* Overridden method of {@link HttpServletBean}, invoked after any bean properties
* have been set. Creates this servlet's WebApplicationContext.
*/
@Override
protected final void initServletBean() throws ServletException {
    getServletContext().log("Initializing Spring FrameworkServlet '" + getServletName() + "'");
    if (this.logger.isInfoEnabled()) {
        this.logger.info("FrameworkServlet '" + getServletName() + "': initialization started");
    }
    long startTime = System.currentTimeMillis();

    try {
        this.webApplicationContext = initWebApplicationContext();
        initFrameworkServlet();
    } catch (ServletException ex) {
        this.logger.error("Context initialization failed", ex);
        throw ex;
    } catch (RuntimeException ex) {
        this.logger.error("Context initialization failed", ex);
        throw ex;
    }

    if (this.logger.isInfoEnabled()) {
        long elapsedTime = System.currentTimeMillis() - startTime;
        this.logger.info("FrameworkServlet '" + getServletName() + "': initialization completed in " + elapsedTime + " ms");
    }
}
在上面的代码中终于看到了我们似曾相识的代码 initWebAppplicationContext(),继续跟进:
/**
* Initialize and publish the WebApplicationContext for this servlet.
* <p>Delegates to {@link #createWebApplicationContext} for actual creation
* of the context. Can be overridden in subclasses.
* @return the WebApplicationContext instance
* @see #FrameworkServlet(WebApplicationContext)
* @see #setContextClass
* @see #setContextConfigLocation
*/
protected WebApplicationContext initWebApplicationContext() {

    //先从 ServletContext 中获得父容器 WebAppliationContext
    WebApplicationContext rootContext =
        WebApplicationContextUtils.getWebApplicationContext(getServletContext());
    //声明子容器
    WebApplicationContext wac = null;

    //建立父、子容器之间的关联关系
    if (this.webApplicationContext != null) {
        // A context instance was injected at construction time -> use it
        wac = this.webApplicationContext;
        if (wac instanceof ConfigurableWebApplicationContext) {
            ConfigurableWebApplicationContext cwac = (ConfigurableWebApplicationContext) wac;
            if (!cwac.isActive()) {
                // The context has not yet been refreshed -> provide services such as setting the parent context, setting the application context id, etc
                if (cwac.getParent() == null) {
                    // The context instance was injected without an explicit parent -> set the root application context (if any; may be null) as the parent
                    cwac.setParent(rootContext);
                }
                configureAndRefreshWebApplicationContext(cwac);
            }
        }
    }
    //先去 ServletContext 中查找 Web 容器的引用是否存在,并创建好默认的空 IOC 容器
    if (wac == null) {
        // No context instance was injected at construction time -> see if one
        // has been registered in the servlet context. If one exists, it is assumed
        // that the parent context (if any) has already been set and that the
        // user has performed any initialization such as setting the context id
        wac = findWebApplicationContext();
    }
    //给上一步创建好的 IOC 容器赋值
    if (wac == null) {
        // No context instance is defined for this servlet -> create a local one
        wac = createWebApplicationContext(rootContext);
    }
    //触发 onRefresh 方法
    if (!this.refreshEventReceived) {
        // Either the context is not a ConfigurableApplicationContext with refresh
        // support or the context injected at construction time had already been
        // refreshed -> trigger initial onRefresh manually here.
        onRefresh(wac);
    }

    if (this.publishContext) {
        // Publish the context as a servlet context attribute.
        String attrName = getServletContextAttributeName();
        getServletContext().setAttribute(attrName, wac);
        if (this.logger.isDebugEnabled()) {
            this.logger.debug("Published WebApplicationContext of servlet '" + getServletName() + "' as ServletContext attribute with name [" + attrName + "]");
        }
    }

    return wac;
}

/**
* Retrieve a {@code WebApplicationContext} from the {@code ServletContext}
* attribute with the {@link #setContextAttribute configured name}. The
* {@code WebApplicationContext} must have already been loaded and stored in the
* {@code ServletContext} before this servlet gets initialized (or invoked).
* <p>Subclasses may override this method to provide a different
* {@code WebApplicationContext} retrieval strategy.
* @return the WebApplicationContext for this servlet, or {@code null} if not found
* @see #getContextAttribute()
*/
@Nullable
protected WebApplicationContext findWebApplicationContext() {
    String attrName = getContextAttribute();
    if (attrName == null) {
        return null;
    }
    WebApplicationContext wac =
        WebApplicationContextUtils.getWebApplicationContext(getServletContext(), attrName);
    if (wac == null) {
        throw new IllegalStateException("No WebApplicationContext found: initializer not registered?");

    }
    return wac;
}

/**
* Instantiate the WebApplicationContext for this servlet, either a default
* {@link org.springframework.web.context.support.XmlWebApplicationContext}
* or a {@link #setContextClass custom context class}, if set.
* <p>This implementation expects custom contexts to implement the
* {@link org.springframework.web.context.ConfigurableWebApplicationContext}
* interface. Can be overridden in subclasses.
* <p>Do not forget to register this servlet instance as application listener on the
* created context (for triggering its {@link #onRefresh callback}, and to call
* {@link org.springframework.context.ConfigurableApplicationContext#refresh()}
* before returning the context instance.
* @param parent the parent ApplicationContext to use, or {@code null} if none
* @return the WebApplicationContext for this servlet
* @see org.springframework.web.context.support.XmlWebApplicationContext
*/
protected WebApplicationContext createWebApplicationContext(@Nullable ApplicationContext parent) {
    Class<?> contextClass = getContextClass();
    if (this.logger.isDebugEnabled()) {
        this.logger.debug("Servlet with name '" + getServletName() + "' will try to create custom WebApplicationContext context of class '" + contextClass.getName() + "'" + ", using parent context [" + parent + "]");
    }
    if (!ConfigurableWebApplicationContext.class.isAssignableFrom(contextClass)) {
        throw new ApplicationContextException( "Fatal initialization error in servlet with name '" + getServletName() + "': custom WebApplicationContext class [" + contextClass.getName() + "] is not of type ConfigurableWebApplicationContext");
    }
    ConfigurableWebApplicationContext wac =
        (ConfigurableWebApplicationContext) BeanUtils.instantiateClass(contextClass);

    wac.setEnvironment(getEnvironment());
    wac.setParent(parent);
    String configLocation = getContextConfigLocation();
    if (configLocation != null) {
        wac.setConfigLocation(configLocation);
    }
    configureAndRefreshWebApplicationContext(wac);
    return wac;

}
protected void configureAndRefreshWebApplicationContext(ConfigurableWebApplicationContext wac) {
    if (ObjectUtils.identityToString(wac).equals(wac.getId())) {
        // The application context id is still set to its original default value
        // -> assign a more useful id based on available information
        if (this.contextId != null) {
            wac.setId(this.contextId);
        } else {
            // Generate default id...
            wac.setId(ConfigurableWebApplicationContext.APPLICATION_CONTEXT_ID_PREFIX +
  ObjectUtils.getDisplayString(getServletContext().getContextPath()) + '/' +
                      getServletName());
        }
    }

    wac.setServletContext(getServletContext());
    wac.setServletConfig(getServletConfig());
    wac.setNamespace(getNamespace());
    wac.addApplicationListener(new SourceFilteringListener(wac, new ContextRefreshListener()));

    // The wac environment's #initPropertySources will be called in any case when the context
    // is refreshed; do it eagerly here to ensure servlet property sources are in place for
    // use in any post-processing or initialization that occurs below prior to #refresh
    ConfigurableEnvironment env = wac.getEnvironment();
    if (env instanceof ConfigurableWebEnvironment) {
        ((ConfigurableWebEnvironment) env).initPropertySources(getServletContext(),
                                                               getServletConfig());
    }

    postProcessWebApplicationContext(wac);
    applyInitializers(wac);
    wac.refresh();

}
从上面的代码中可以看出,在 configAndRefreshWebApplicationContext()方法中,调用 refresh() 方法,这个是真正启动 IOC 容器的入口,后面会详细介绍。IOC 容器初始化以后,最后调用了DispatcherServlet 的 onRefresh() 方法,在 onRefresh()方法中又是直接调用 initStrategies()方法初始化 SpringMVC 的九大组件:
/**
* This implementation calls {@link #initStrategies}.
*/
@Override
protected void onRefresh(ApplicationContext context) {
    initStrategies(context);
}

/**
* Initialize the strategy objects that this servlet uses.
* <p>May be overridden in subclasses in order to initialize further strategy objects.
*/
//初始化策略
protected void initStrategies(ApplicationContext context) {
    //多文件上传的组件
    initMultipartResolver(context);
    //初始化本地语言环境
    initLocaleResolver(context);
    //初始化模板处理器
    initThemeResolver(context);
    //handlerMapping
    initHandlerMappings(context);
    //初始化参数适配器
    initHandlerAdapters(context);
    //初始化异常拦截器
    initHandlerExceptionResolvers(context);
    //初始化视图预处理器
    initRequestToViewNameTranslator(context);
    //初始化视图转换器
    initViewResolvers(context);
    //初始化FlashMap
    initFlashMapManager(context);
}
基于 Xml 的 IOC 容器的初始化
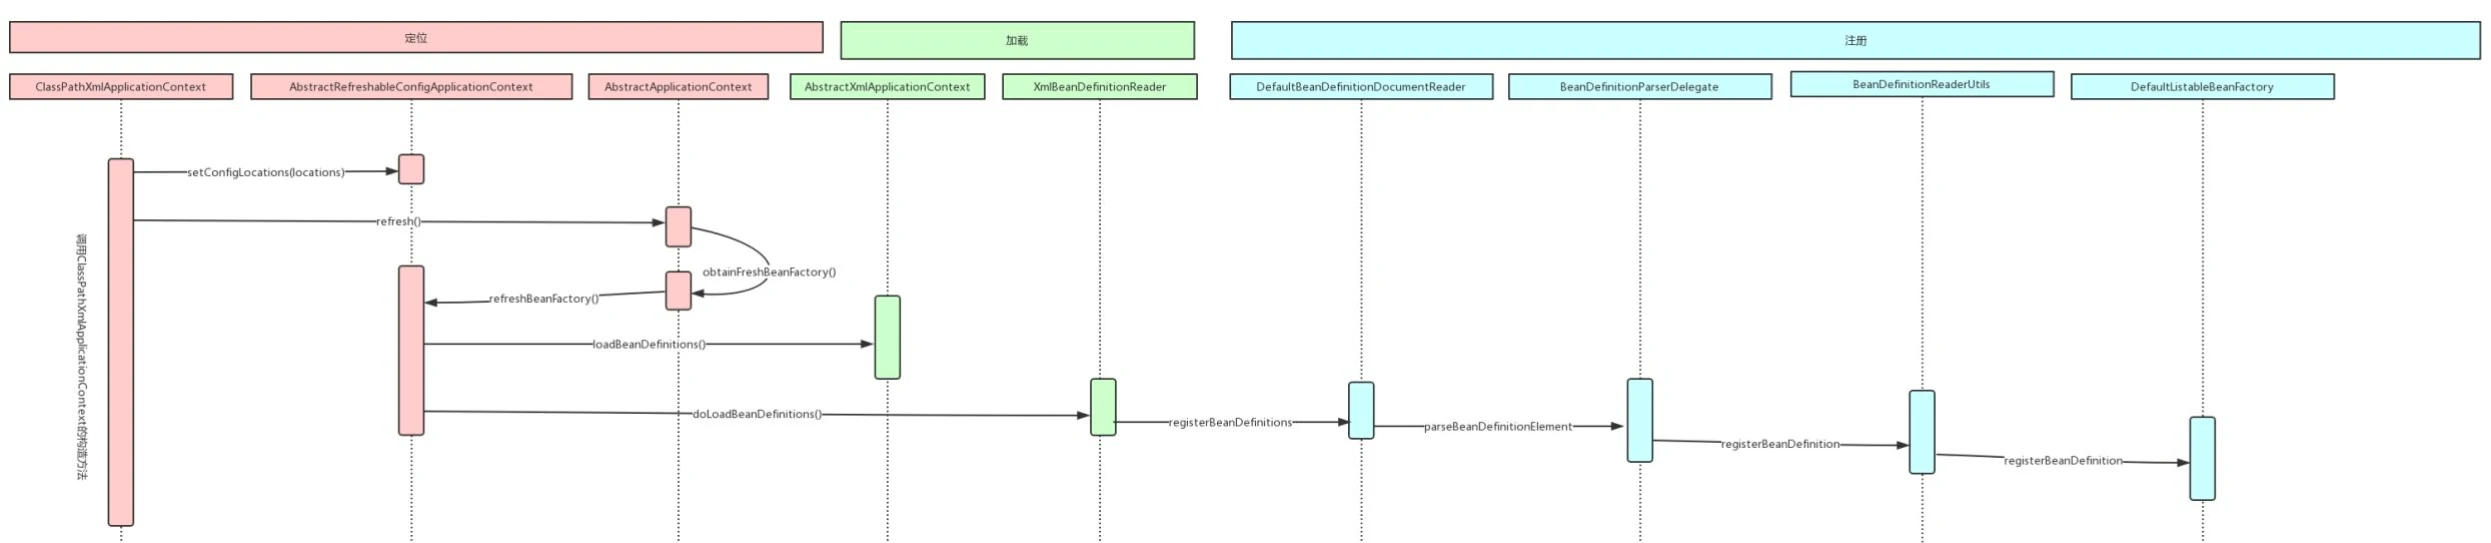
IOC 容器的初始化包括 BeanDefinition 的 Resource 定位、加载和注册这三个基本的过程。我们以ApplicationContext 为例讲解,ApplicationContext 系列容器也许是我们最熟悉的,因为 Web 项目中使用的 XmlWebApplicationContext 就属于这个继承体系,还有 ClasspathXmlApplicationContext 等,其继承体系如下图所示:

ApplicationContext 允许上下文嵌套,通过保持父上下文可以维持一个上下文体系。对于 Bean 的查找可以在这个上下文体系中发生,首先检查当前上下文,其次是父上下文,逐级向上,这样为不同的 Spring 应用提供了一个共享的 Bean 定义环境。
1、寻找入口
还有一个我们用的比较多的 ClassPathXmlApplicationContext,通过 main()方法启动:
ApplicationContext app = new ClassPathXmlApplicationContext("application.xml");
先看其构造函数的调用:
public ClassPathXmlApplicationContext(String configLocation) throws BeansException {
    this(new String[]{configLocation}, true, (ApplicationContext)null);
}
其实际调用的构造函数为:
public ClassPathXmlApplicationContext(String[] configLocations, boolean refresh, @Nullable ApplicationContext parent) throws BeansException {
    super(parent);
    this.setConfigLocations(configLocations);
    if(refresh) {
        this.refresh();
    }
}
还有像 AnnotationConfigApplicationContext 、 FileSystemXmlApplicationContext 、
XmlWebApplicationContext等都继承自父容器 AbstractApplicationContext主要用到了装饰器模式和策略模式,最终都是调用 refresh()方法。
2、获得配置路径
通过分析 ClassPathXmlApplicationContext 的源代码可以知道,在创建 ClassPathXmlApplicationContext 容器时,构造方法做以下两项重要工作:
首先,调用父类容器的构造方法(super(parent)方法)为容器设置好 Bean 资源加载器。
然后,再调用父类AbstractRefreshableConfigApplicationContext 的setConfigLocations(configLocations)方法设置 Bean 配置信息的定位路径。
通过追踪 ClassPathXmlApplicationContext 的继承体系,发现其父类的父类AbstractApplicationContext 中初始化 IOC 容器所做的主要源码如下:
public abstract class AbstractApplicationContext extends DefaultResourceLoader
    implements ConfigurableApplicationContext {
    //静态初始化块,在整个容器创建过程中只执行一次
    static {
        //为了避免应用程序在 Weblogic8.1 关闭时出现类加载异常加载问题,加载 IOC 容
        //器关闭事件(ContextClosedEvent)类
        ContextClosedEvent.class.getName();
    }
    public AbstractApplicationContext() {
        this.resourcePatternResolver = getResourcePatternResolver();
    }
    public AbstractApplicationContext(@Nullable ApplicationContext parent) {
        this();
        setParent(parent);
    }
    //获取一个 Spring Source 的加载器用于读入 Spring Bean 配置信息
    protected ResourcePatternResolver getResourcePatternResolver() {
        //AbstractApplicationContext 继承 DefaultResourceLoader,因此也是一个资源加载器
        //Spring 资源加载器,其 getResource(String location)方法用于载入资源
        return new PathMatchingResourcePatternResolver(this);
    }
    ...
}
AbstractApplicationContext 的默认构造方法中有调用 PathMatchingResourcePatternResolver 的
构造方法创建 Spring 资源加载器:
public PathMatchingResourcePatternResolver(ResourceLoader resourceLoader) {
    Assert.notNull(resourceLoader, "ResourceLoader must not be null");
    //设置 Spring 的资源加载器
    this.resourceLoader = resourceLoader;
}
在设置容器的资源加载器之后,接下来 ClassPathXmlApplicationContext 执行 setConfigLocations() 方法通过调用其父类 AbstractRefreshableConfigApplicationContext的方法进行对 Bean配置信息的定位,该方法的源码如下:
/**
* Set the config locations for this application context in init-param style,
* i.e. with distinct locations separated by commas, semicolons or whitespace.
* <p>If not set, the implementation may use a default as appropriate.
*/
//处理单个资源文件路径为一个字符串的情况
public void setConfigLocation(String location) {
    //String CONFIG_LOCATION_DELIMITERS = ",; /t/n";
    //即多个资源文件路径之间用” ,; \t\n”分隔,解析成数组形式
    setConfigLocations(StringUtils.tokenizeToStringArray(location, CONFIG_LOCATION_DELIMITERS));
}

/**
* Set the config locations for this application context.
* <p>If not set, the implementation may use a default as appropriate.
*/
//解析 Bean 定义资源文件的路径,处理多个资源文件字符串数组
public void setConfigLocations(@Nullable String... locations) {
    if (locations != null) {
        Assert.noNullElements(locations, "Config locations must not be null");
        this.configLocations = new String[locations.length];
        for (int i = 0; i < locations.length; i++) {
            // resolvePath 为同一个类中将字符串解析为路径的方法
            this.configLocations[i] = resolvePath(locations[i]).trim();
        }
    } else {
        this.configLocations = null;
    }
}
通过这两个方法的源码我们可以看出,我们既可以使用一个字符串来配置多个 Spring Bean 配置信息,也可以使用字符串数组,即下面两种方式都是可以的:
ClassPathResource res = new ClassPathResource("a.xml,b.xml");
多个资源文件路径之间可以是用" , ; \t\n"等分隔。
ClassPathResource res =new ClassPathResource(new String[]{"a.xml","b.xml"})
至此,SpringIOC 容器在初始化时将配置的 Bean 配置信息定位为 Spring 封装的 Resource。
3、开始启动
SpringIOC 容器对 Bean 配置资源的载入是从 refresh() 函数开始的,refresh() 是一个模板方法,规定了 IOC 容器的启动流程,有些逻辑要交给其子类去实现。它对Bean配置资源进行载入ClassPathXmlApplicationContext 通过调用其父类 AbstractApplicationContext 的 refresh() 函数启动整个 IOC 容器对 Bean 定义的载入过程,现在我们来详细看看 refresh()中的逻辑处理:
@Override
public void refresh() throws BeansException, IllegalStateException {
    synchronized (this.startupShutdownMonitor) {
        // Prepare this context for refreshing.
        //1、调用容器准备刷新的方法,获取容器的当时时间,同时给容器设置同步标识
        prepareRefresh();

        // Tell the subclass to refresh the internal bean factory.
        //2、告诉子类启动 refreshBeanFactory()方法,Bean 定义资源文件的载入从
        //子类的 refreshBeanFactory()方法启动
        ConfigurableListableBeanFactory beanFactory = obtainFreshBeanFactory();

        // Prepare the bean factory for use in this context.
        //3、为 BeanFactory 配置容器特性,例如类加载器、事件处理器等
        prepareBeanFactory(beanFactory);

        try {
            // Allows post-processing of the bean factory in context subclasses.
            //4、为容器的某些子类指定特殊的 BeanPost 事件处理器
            postProcessBeanFactory(beanFactory);

            // Invoke factory processors registered as beans in the context.
            //5、调用所有注册的 BeanFactoryPostProcessor 的 Bean
            invokeBeanFactoryPostProcessors(beanFactory);

            // Register bean processors that intercept bean creation.
            //6、为 BeanFactory 注册 BeanPost 事件处理器.
            //BeanPostProcessor 是 Bean 后置处理器,用于监听容器触发的事件
            registerBeanPostProcessors(beanFactory);

            // Initialize message source for this context.
            //7、初始化信息源,和国际化相关.
            initMessageSource();

            // Initialize event multicaster for this context.
            //8、初始化容器事件传播器.
            initApplicationEventMulticaster();

            // Initialize other special beans in specific context subclasses.
            //9、调用子类的某些特殊 Bean 初始化方法
            onRefresh();

            // Check for listener beans and register them.
            //10、为事件传播器注册事件监听器.
            registerListeners();

            // Instantiate all remaining (non-lazy-init) singletons.
            //11、初始化所有剩余的单例 Bean
            finishBeanFactoryInitialization(beanFactory);

            // Last step: publish corresponding event.
            //12、初始化容器的生命周期事件处理器,并发布容器的生命周期事件
            finishRefresh();

        } catch (BeansException ex) {
            if (logger.isWarnEnabled()) {
                logger.warn("Exception encountered during context initialization - " + "cancelling refresh attempt: " + ex);
            }

            // Destroy already created singletons to avoid dangling resources.
            //13、销毁已创建的 Bean
            destroyBeans();

            // Reset 'active' flag.
            //14、取消 refresh 操作,重置容器的同步标识.
            cancelRefresh(ex);

            // Propagate exception to caller.
            throw ex;

        } finally {
            // Reset common introspection caches in Spring's core, since we
            // might not ever need metadata for singleton beans anymore...
            //15、重设公共缓存
            resetCommonCaches();
        }
    }
}
refresh()方法主要为 IOC 容器 Bean 的生命周期管理提供条件,Spring IOC 容器载入 Bean 配置信息从其子类容器的 refreshBeanFactory() 方法启动, 所以整个 refresh() 中 "ConfigurableListableBeanFactory beanFactory = obtainFreshBeanFactory();" 这句以后代码的都是注册容器的信息源和生命周期事件,我们前面说的载入就是从这句代码开始启动。
refresh()方法的主要作用是:在创建 IOC 容器前,如果已经有容器存在,则需要把已有的容器销毁和关闭,以保证在 refresh 之后使用的是新建立起来的 IOC 容器。它类似于对 IOC 容器的重启,在新建立好的容器中对容器进行初始化,对 Bean 配置资源进行载入。
4、创建容器
obtainFreshBeanFactory() 方法调用子类容器的 refreshBeanFactory()方法,启动容器载入 Bean 配置信息的过程,代码如下:
protected ConfigurableListableBeanFactory obtainFreshBeanFactory() {
    //这里使用了委派设计模式,父类定义了抽象的 refreshBeanFactory()方法,具体实现调用子类容器的 refreshBeanFactory()方法
    refreshBeanFactory();
    ConfigurableListableBeanFactory beanFactory = getBeanFactory();
    if (logger.isDebugEnabled()) {
        logger.debug("Bean factory for " + getDisplayName() + ": " + beanFactory);
    }
    return beanFactory;
}
AbstractApplicationContext类中只抽象定义了 refreshBeanFactory()方法,容器真正调用的是其子类 AbstractRefreshableApplicationContext 实现的 refreshBeanFactory()方法,方法的源码如下:
protected final void refreshBeanFactory() throws BeansException {
    //如果已经有容器,销毁容器中的 bean,关闭容器
    if (hasBeanFactory()) {
        destroyBeans();
        closeBeanFactory();
    }
    try {
        //创建 IOC 容器
        DefaultListableBeanFactory beanFactory = createBeanFactory();
        beanFactory.setSerializationId(getId());
        //对 IOC 容器进行定制化,如设置启动参数,开启注解的自动装配等
        customizeBeanFactory(beanFactory);
        //调用载入 Bean 定义的方法,主要这里又使用了一个委派模式,在当前类中只定义了抽象的 loadBeanDefinitions 方法,具体的实现调用子类容器
        loadBeanDefinitions(beanFactory);
        synchronized (this.beanFactoryMonitor) {
            this.beanFactory = beanFactory;
        }
    }catch (IOException ex) {
        throw new ApplicationContextException("I/O error parsing bean definition source for " + getDisplayName(), ex);
    }
}
在这个方法中,先判断 BeanFactory 是否存在,如果存在则先销毁 beans 并关闭 beanFactory,接着创建 DefaultListableBeanFactory,并调用 loadBeanDefinitions(beanFactory) 装载 bean 定义。
5、载入配置路径
AbstractRefreshableApplicationContext 中只定义了抽象的 loadBeanDefinitions 方法,容器真正调用的是其子类 AbstractXmlApplicationContext 对该方法的实现,AbstractXmlApplicationContext 的主要源码如下:
loadBeanDefinitions() 方法同样是抽象方法,是由其子类实现的,也即在 AbstractXmlApplicationContext 中。
public abstract class AbstractXmlApplicationContext extends AbstractRefreshableConfigApplicationContext {
    // ...

    //实现父类抽象的载入 Bean 定义方法
    @Override
    protected void loadBeanDefinitions(DefaultListableBeanFactory beanFactory) throws BeansException, IOException {

        //创建 XmlBeanDefinitionReader,即创建 Bean 读取器,并通过回调设置到容器中去,容器使用该读取器读取 Bean 配置资源
        XmlBeanDefinitionReader beanDefinitionReader = new XmlBeanDefinitionReader(beanFactory);

        //为 Bean 读取器设置 Spring 资源加载器,AbstractXmlApplicationContext 的 祖先父类 AbstractApplicationContext 继承 DefaultResourceLoader,因此,容器本身也是一个资源加载器
        beanDefinitionReader.setEnvironment(this.getEnvironment());
        beanDefinitionReader.setResourceLoader(this);
        //为 Bean 读取器设置 SAX xml 解析器
        beanDefinitionReader.setEntityResolver(new ResourceEntityResolver(this));

        //当 Bean 读取器读取 Bean 定义的 Xml 资源文件时,启用 Xml 的校验机制
        initBeanDefinitionReader(beanDefinitionReader);
        //Bean 读取器真正实现加载的方法
        loadBeanDefinitions(beanDefinitionReader);
    }

    protected void initBeanDefinitionReader(XmlBeanDefinitionReader reader) {
        reader.setValidating(this.validating);
    }

    //Xml Bean 读取器加载 Bean 配置资源
    protected void loadBeanDefinitions(XmlBeanDefinitionReader reader) throws BeansException, IOException {
        //获取 Bean 配置资源的定位
        Resource[] configResources = getConfigResources();
        if (configResources != null) {
            //Xml Bean 读取器调用其父类 AbstractBeanDefinitionReader 读取定位的 Bean 配置资源
            reader.loadBeanDefinitions(configResources);
        }
        // 如果子类中获取的 Bean 配置资源定位为空,则获取 ClassPathXmlApplicationContext
        // 构造方法中 setConfigLocations 方法设置的资源
        String[] configLocations = getConfigLocations();
        if (configLocations != null) {
            //Xml Bean 读取器调用其父类 AbstractBeanDefinitionReader 读取定位
            //的 Bean 配置资源
            reader.loadBeanDefinitions(configLocations);
        }
    }

    //这里又使用了一个委托模式,调用子类的获取 Bean 配置资源定位的方法
    //该方法在 ClassPathXmlApplicationContext 中进行实现,对于我们
    //举例分析源码的 ClassPathXmlApplicationContext 没有使用该方法
    @Nullable
    protected Resource[] getConfigResources() {
        return null;
    }
}
以 XmlBean 读取器的其中一种策略 XmlBeanDefinitionReader 为例。XmlBeanDefinitionReader 调用其父类AbstractBeanDefinitionReader的 reader.loadBeanDefinitions()方法读取Bean配置资源。
由于我们使用 ClassPathXmlApplicationContext 作为例子分析,因此 getConfigResources 的返回值为 null,因此程序执行 reader.loadBeanDefinitions(configLocations)分支。
6、分配路径处理策略
在 XmlBeanDefinitionReader 的抽象父类 AbstractBeanDefinitionReader 中定义了载入过程。
AbstractBeanDefinitionReader 的 loadBeanDefinitions()方法源码如下:
//重载方法,调用下面的 loadBeanDefinitions(String, Set<Resource>);方法
@Override
public int loadBeanDefinitions(String location) throws BeanDefinitionStoreException {
    return loadBeanDefinitions(location, null);
}

public int loadBeanDefinitions(String location, @Nullable Set<Resource> actualResources) throws BeanDefinitionStoreException {
    //获取在 IOC 容器初始化过程中设置的资源加载器
    ResourceLoader resourceLoader = getResourceLoader();
    if (resourceLoader == null) {
        throw new BeanDefinitionStoreException("Cannot import bean definitions from location [" + location + "]: no ResourceLoader available");
    }

    if (resourceLoader instanceof ResourcePatternResolver) {
        // Resource pattern matching available.
        try {
            //将指定位置的 Bean 配置信息解析为 Spring IOC 容器封装的资源
            //加载多个指定位置的 Bean 配置信息
            Resource[] resources = ((ResourcePatternResolver) resourceLoader).getResources(location);
            //委派调用其子类 XmlBeanDefinitionReader 的方法,实现加载功能
            int loadCount = loadBeanDefinitions(resources);
            if (actualResources != null) {
                for (Resource resource : resources) {
                    actualResources.add(resource);
                }
            }
            if (logger.isDebugEnabled()) {
                logger.debug("Loaded " + loadCount + " bean definitions from location pattern [" + location + "]");
            }
            return loadCount;
        } catch (IOException ex) {
            throw new BeanDefinitionStoreException( "Could not resolve bean definition resource pattern [" + location + "]", ex);
        }
    } else {
        // Can only load single resources by absolute URL.
        //将指定位置的 Bean 配置信息解析为 Spring IOC 容器封装的资源
        //加载单个指定位置的 Bean 配置信息
        Resource resource = resourceLoader.getResource(location);
        //委派调用其子类 XmlBeanDefinitionReader 的方法,实现加载功能
        int loadCount = loadBeanDefinitions(resource);
        if (actualResources != null) {
            actualResources.add(resource);
        }
        if (logger.isDebugEnabled()) {
            logger.debug("Loaded " + loadCount + " bean definitions from location [" + location + "]");
        }
        return loadCount;

    }
}

//重载方法,调用 loadBeanDefinitions(String);
@Override
public int loadBeanDefinitions(String... locations) throws BeanDefinitionStoreException {
    Assert.notNull(locations, "Location array must not be null");
    int counter = 0;
    for (String location : locations) {
        counter += loadBeanDefinitions(location);
    }
    return counter;
}
AbstractRefreshableConfigApplicationContext 的 loadBeanDefinitions(Resource...resources) 方法实际上是调用 AbstractBeanDefinitionReader 的 loadBeanDefinitions()方法。
从对 AbstractBeanDefinitionReader 的 loadBeanDefinitions()方法源码分析可以看出该方法就做了两件事:
首先,调用资源加载器的获取资源方法 resourceLoader.getResource(location),获取到要加载的资源。
其次,真正执行加载功能是其子类 XmlBeanDefinitionReader 的 loadBeanDefinitions()方法。在loadBeanDefinitions()方法中调用了 AbstractApplicationContext 的 getResources()方法,跟进去之后发现 getResources()方法其实定义在 ResourcePatternResolver 中,此时,我们有必要来看一下ResourcePatternResolver 的全类图:


从上面可以看到 ResourceLoader 与 ApplicationContext 的继承关系,可以看出其实际调用的是
DefaultResourceLoader 中的getSource()方法定位Resource,因为 ClassPathXmlApplicationContext 本身就是 DefaultResourceLoader 的实现类,所以此时又回到了 ClassPathXmlApplicationContext 中来。
7、解析配置文件路径
XmlBeanDefinitionReader 通过调用 ClassPathXmlApplicationContext 的父类 DefaultResourceLoader 的getResource() 方法获取要加载的资源,其源码如下
//获取 Resource 的具体实现方法
@Override
public Resource getResource(String location) {
    Assert.notNull(location, "Location must not be null");

    for (ProtocolResolver protocolResolver : this.protocolResolvers) {
        Resource resource = protocolResolver.resolve(location, this);
        if (resource != null) {
            return resource;
        }
    }
    //如果是类路径的方式,那需要使用 ClassPathResource 来得到 bean 文件的资源对象
    if (location.startsWith("/")) {
        return getResourceByPath(location);
    } else if (location.startsWith(CLASSPATH_URL_PREFIX)) {
        return new ClassPathResource(location.substring(CLASSPATH_URL_PREFIX.length()), getClassLoader());
    } else {
        try {
            // 如果是 URL 方式,使用 UrlResource 作为 bean 文件的资源对象
            URL url = new URL(location);
            return (ResourceUtils.isFileURL(url) ? new FileUrlResource(url) : new UrlResource(url));
        } catch (MalformedURLException ex) {
            //如果既不是 classpath 标识,又不是 URL 标识的 Resource 定位,则调用
            //容器本身的 getResourceByPath 方法获取 Resource
            return getResourceByPath(location);
        }
    }
}
DefaultResourceLoader 提供了 getResourceByPath() 方法的实现,就是为了处理既不是 classpath 标识,又不是 URL 标识的 Resource 定位这种情况。
protected Resource getResourceByPath(String path) {
    return new ClassPathContextResource(path, getClassLoader());
}
在 ClassPathResource 中完成了对整个路径的解析。这样,就可以从类路径上对 IOC 配置文件进行加载,当然我们可以按照这个逻辑从任何地方加载,在 Spring 中我们看到它提供的各种资源抽象,比如 ClassPathResource、URLResource、FileSystemResource 等来供我们使用。上面我们看到的是定位 Resource 的一个过程,而这只是加载过程的一部分。例如 FileSystemXmlApplication 容器就重写了 getResourceByPath() 方法:
@Override
protected Resource getResourceByPath(String path) {
    if (path.startsWith("/")) {
        path = path.substring(1);
    }
    //这里使用文件系统资源对象来定义 bean 文件
    return new FileSystemResource(path);
}
通过子类的覆盖,巧妙地完成了将类路径变为文件路径的转换。
8、开始读取配置内容
继续回到 XmlBeanDefinitionReader 的 loadBeanDefinitions(Resource ...)方法看到代表 bean 文件的资源定义以后的载入过程。
//XmlBeanDefinitionReader 加载资源的入口方法
@Override
public int loadBeanDefinitions(Resource resource) throws BeanDefinitionStoreException {
    //将读入的 XML 资源进行特殊编码处理
    return loadBeanDefinitions(new EncodedResource(resource));
}

//这里是载入 XML 形式 Bean 配置信息方法
public int loadBeanDefinitions(EncodedResource encodedResource) throws BeanDefinitionStoreException {
    // ...
    try {
        //将资源文件转为 InputStream 的 IO 流
        InputStream inputStream = encodedResource.getResource().getInputStream();
        try {
            //从 InputStream 中得到 XML 的解析源
            InputSource inputSource = new InputSource(inputStream);
            if (encodedResource.getEncoding() != null) {
                inputSource.setEncoding(encodedResource.getEncoding());
            }
            //这里是具体的读取过程
            return doLoadBeanDefinitions(inputSource, encodedResource.getResource());
        } finally {
            //关闭从 Resource 中得到的 IO 流
            inputStream.close();
        }
    }
    // ...
}
//从特定 XML 文件中实际载入 Bean 配置资源的方法
protected int doLoadBeanDefinitions(InputSource inputSource, Resource resource)
    throws BeanDefinitionStoreException {
    try {
        //将 XML 文件转换为 DOM 对象,解析过程由 documentLoader 实现
        Document doc = doLoadDocument(inputSource, resource);
        //这里是启动对 Bean 定义解析的详细过程,该解析过程会用到 Spring 的 Bean 配置规则
        return registerBeanDefinitions(doc, resource);
    }
    // ...
}
通过源码分析,载入 Bean 配置信息的最后一步是将 Bean 配置信息转换为 Document 对象,该过程由doLoadDocument() 方法实现。
9、准备文档对象
DocumentLoader 将 Bean 配置资源转换成 Document 对象的源码如下:
//使用标准的 JAXP 将载入的 Bean 配置资源转换成 document 对象
@Override
public Document loadDocument(InputSource inputSource, EntityResolver entityResolver,
                             ErrorHandler errorHandler, int validationMode, boolean namespaceAware) throws Exception {

    //创建文件解析器工厂
    DocumentBuilderFactory factory = createDocumentBuilderFactory(validationMode, namespaceAware);
    if (logger.isDebugEnabled()) {
        logger.debug("Using JAXP provider [" + factory.getClass().getName() + "]");
    }
    //创建文档解析器
    DocumentBuilder builder = createDocumentBuilder(factory, entityResolver, errorHandler);
    //解析 Spring 的 Bean 配置资源
    return builder.parse(inputSource);
}

protected DocumentBuilderFactory createDocumentBuilderFactory(int validationMode, boolean namespaceAware) throws ParserConfigurationException {

    //创建文档解析工厂
    DocumentBuilderFactory factory = DocumentBuilderFactory.newInstance();
    factory.setNamespaceAware(namespaceAware);

    //设置解析 XML 的校验
    if (validationMode != XmlValidationModeDetector.VALIDATION_NONE) {
        factory.setValidating(true);
        if (validationMode == XmlValidationModeDetector.VALIDATION_XSD) {
            // Enforce namespace aware for XSD...
            factory.setNamespaceAware(true);
            try {
                factory.setAttribute(SCHEMA_LANGUAGE_ATTRIBUTE, XSD_SCHEMA_LANGUAGE);
            } catch (IllegalArgumentException ex) {
                ParserConfigurationException pcex = new ParserConfigurationException("Unable to validate using XSD: Your JAXP provider [" + factory + "] does not support XML Schema. Are you running on Java 1.4 with Apache Crimson? " + "Upgrade to Apache Xerces (or Java 1.5) for full XSD support.");
                pcex.initCause(ex);
                throw pcex;
            }
        }
    }

    return factory;
}
上面的解析过程是调用 JavaEE标准的 JAXP标准进行处理。至此 Spring IOC容器根据定位的 Bean配置信息,将其加载读入并转换成为 Document对象过程完成。接下来我们要继续分析 Spring IOC容器将载入的 Bean配置信息转换为 Document对象之后,是如何将其解析为 Spring IOC管理的 Bean对象并将其注册到容器中的。
10、分配解析策略
XmlBeanDefinitionReader 类中的 doLoadBeanDefinition() 方法是从特定 XML 文件中实际载入Bean 配置资源的方法,该方法在载入 Bean配置资源之后将其转换为 Document对象,接下来调用 registerBeanDefinitions()启动 Spring IOC容器对 Bean定义的解析过程,registerBeanDefinitions()方法源码如下:
//按照 Spring 的 Bean 语义要求将 Bean 配置资源解析并转换为容器内部数据结构
public int registerBeanDefinitions(Document doc, Resource resource) throws BeanDefinitionStoreException {
    //得到 BeanDefinitionDocumentReader 来对 xml 格式的 BeanDefinition 解析
    BeanDefinitionDocumentReader documentReader = createBeanDefinitionDocumentReader();
    //获得容器中注册的 Bean 数量
    int countBefore = getRegistry().getBeanDefinitionCount();
    //解析过程入口,这里使用了委派模式,BeanDefinitionDocumentReader 只是个接口,
    //具体的解析实现过程有实现类 DefaultBeanDefinitionDocumentReader 完成
    documentReader.registerBeanDefinitions(doc, createReaderContext(resource));
    //统计解析的 Bean 数量
    return getRegistry().getBeanDefinitionCount() - countBefore;
}
Bean 配置资源的载入解析分为以下两个过程:
首先,通过调用 XML 解析器将 Bean 配置信息转换得到 Document 对象,但是这些 Document 对象并没有按照 Spring 的 Bean 规则进行解析。这一步是载入的过程
其次,在完成通用的 XML 解析之后,按照 Spring Bean 的定义规则对 Document 对象进行解析,其解析过程是在接口BeanDefinitionDocumentReader的实现类 DefaultBeanDefinitionDocumentReader 中实现。
11、将配置载入内存
BeanDefinitionDocumentReader 接 口 通 过 registerBeanDefinitions() 方法调用其实现类DefaultBeanDefinitionDocumentReader 对 Document 对象进行解析,解析的代码如下:
//根据 Spring DTD 对 Bean 的定义规则解析 Bean 定义 Document 对象
@Override
public void registerBeanDefinitions(Document doc, XmlReaderContext readerContext) {
    //获得 XML 描述符
    this.readerContext = readerContext;
    logger.debug("Loading bean definitions");
    //获得 Document 的根元素
    Element root = doc.getDocumentElement();
    doRegisterBeanDefinitions(root);
}

// ...

protected void doRegisterBeanDefinitions(Element root) {

    //具体的解析过程由 BeanDefinitionParserDelegate 实现,
    //BeanDefinitionParserDelegate 中定义了 Spring Bean 定义 XML 文件的各种元素
    BeanDefinitionParserDelegate parent = this.delegate;
    this.delegate = createDelegate(getReaderContext(), root, parent);

    if (this.delegate.isDefaultNamespace(root)) {
        String profileSpec = root.getAttribute(PROFILE_ATTRIBUTE);
        if (StringUtils.hasText(profileSpec)) {
            String[] specifiedProfiles = StringUtils.tokenizeToStringArray(
                profileSpec, BeanDefinitionParserDelegate.MULTI_VALUE_ATTRIBUTE_DELIMITERS);
            if (!getReaderContext().getEnvironment().acceptsProfiles(specifiedProfiles)) {
                if (logger.isInfoEnabled()) {
                    logger.info("Skipped XML bean definition file due to specified profiles [" + profileSpec + "] not matching: " + getReaderContext().getResource());
                }
                return;
            }
        }
    }

    //在解析 Bean 定义之前,进行自定义的解析,增强解析过程的可扩展性
    preProcessXml(root);
    //从 Document 的根元素开始进行 Bean 定义的 Document 对象
    parseBeanDefinitions(root, this.delegate);
    //在解析 Bean 定义之后,进行自定义的解析,增加解析过程的可扩展性
    postProcessXml(root);

    this.delegate = parent;
}

//创建 BeanDefinitionParserDelegate,用于完成真正的解析过程
protected BeanDefinitionParserDelegate createDelegate(
    XmlReaderContext readerContext, Element root, @Nullable BeanDefinitionParserDelegate parentDelegate) {

    BeanDefinitionParserDelegate delegate = new BeanDefinitionParserDelegate(readerContext);
    //BeanDefinitionParserDelegate 初始化 Document 根元素
    delegate.initDefaults(root, parentDelegate);
    return delegate;
}

//使用 Spring 的 Bean 规则从 Document 的根元素开始进行 Bean 定义的 Document 对象
protected void parseBeanDefinitions(Element root, BeanDefinitionParserDelegate delegate) {
    //Bean 定义的 Document 对象使用了 Spring 默认的 XML 命名空间
    if (delegate.isDefaultNamespace(root)) {
        //获取 Bean 定义的 Document 对象根元素的所有子节点
        NodeList nl = root.getChildNodes();
        for (int i = 0; i < nl.getLength(); i++) {
            Node node = nl.item(i);
            //获得 Document 节点是 XML 元素节点
            if (node instanceof Element) {
                Element ele = (Element) node;
                //Bean 定义的 Document 的元素节点使用的是 Spring 默认的 XML 命名空间
                if (delegate.isDefaultNamespace(ele)) {
                    //使用 Spring 的 Bean 规则解析元素节点
                    parseDefaultElement(ele, delegate);
                }
                else {
                    //没有使用 Spring 默认的 XML 命名空间,则使用用户自定义的解//析规则解析元素节点
                    delegate.parseCustomElement(ele);
                }
            }
        }
    } else {
        //Document 的根节点没有使用 Spring 默认的命名空间,则使用用户自定义的
        //解析规则解析 Document 根节点
        delegate.parseCustomElement(root);
    }
}

//使用 Spring 的 Bean 规则解析 Document 元素节点
private void parseDefaultElement(Element ele, BeanDefinitionParserDelegate delegate) {
    //如果元素节点是<Import>导入元素,进行导入解析
    if (delegate.nodeNameEquals(ele, IMPORT_ELEMENT)) {
        importBeanDefinitionResource(ele);
    }
    //如果元素节点是<Alias>别名元素,进行别名解析
    else if (delegate.nodeNameEquals(ele, ALIAS_ELEMENT)) {
        processAliasRegistration(ele);
    }
    //元素节点既不是导入元素,也不是别名元素,即普通的<Bean>元素,
    //按照 Spring 的 Bean 规则解析元素
    else if (delegate.nodeNameEquals(ele, BEAN_ELEMENT)) {
        processBeanDefinition(ele, delegate);
    }
    else if (delegate.nodeNameEquals(ele, NESTED_BEANS_ELEMENT)) {
        // recurse
        doRegisterBeanDefinitions(ele);
    }
}

//解析<Import>导入元素,从给定的导入路径加载 Bean 配置资源到 Spring IOC 容器中
protected void importBeanDefinitionResource(Element ele) {
    //获取给定的导入元素的 location 属性
    String location = ele.getAttribute(RESOURCE_ATTRIBUTE);
    //如果导入元素的 location 属性值为空,则没有导入任何资源,直接返回
    if (!StringUtils.hasText(location)) {
        getReaderContext().error("Resource location must not be empty", ele);
        return;
    }
    //使用系统变量值解析 location 属性值
    location = getReaderContext().getEnvironment().resolveRequiredPlaceholders(location);

    Set<Resource> actualResources = new LinkedHashSet<>(4);

    //标识给定的导入元素的 location 是否是绝对路径
    boolean absoluteLocation = false;
    try {
        absoluteLocation = ResourcePatternUtils.isUrl(location) || ResourceUtils.toURI(location).isAbsolute();
    } catch (URISyntaxException ex) {
        //给定的导入元素的 location 不是绝对路径
    }

    // Absolute or relative?
    //给定的导入元素的 location 是绝对路径
    if (absoluteLocation) {
        try {
            //使用资源读入器加载给定路径的 Bean 配置资源
            int importCount = getReaderContext().getReader().loadBeanDefinitions(location, actualResources);
            if (logger.isDebugEnabled()) {
                logger.debug("Imported " + importCount + " bean definitions from URL location [" + location + "]");
            }
        } catch (BeanDefinitionStoreException ex) {
            getReaderContext().error("Failed to import bean definitions from URL location [" + location + "]", ele, ex);
        }
    } else {
        //给定的导入元素的 location 是相对路径
        try {
            int importCount;
            //将给定导入元素的 location 封装为相对路径资源
            Resource relativeResource = getReaderContext().getResource().createRelative(location);
            //封装的相对路径资源存在
            if (relativeResource.exists()) {
                //使用资源读入器加载 Bean 配置资源
                importCount = getReaderContext().getReader().loadBeanDefinitions(relativeResource);
                actualResources.add(relativeResource);
            }
            //封装的相对路径资源不存在
            else {
                //获取 Spring IOC 容器资源读入器的基本路径
                String baseLocation = getReaderContext().getResource().getURL().toString();
                //根据 Spring IOC 容器资源读入器的基本路径加载给定导入路径的资源
                importCount = getReaderContext().getReader().loadBeanDefinitions(
                    StringUtils.applyRelativePath(baseLocation, location), actualResources);
            }
            if (logger.isDebugEnabled()) {
                logger.debug("Imported " + importCount + " bean definitions from relative location [" + location + "]");
            }
        } catch (IOException ex) {
            getReaderContext().error("Failed to resolve current resource location", ele, ex);
        } catch (BeanDefinitionStoreException ex) {
            getReaderContext().error("Failed to import bean definitions from relative location [" + location + "]", ele, ex);
        }
    }
    Resource[] actResArray = actualResources.toArray(new Resource[actualResources.size()]);
    //在解析完<Import>元素之后,发送容器导入其他资源处理完成事件
    getReaderContext().fireImportProcessed(location, actResArray, extractSource(ele));
}

//解析<Alias>别名元素,为 Bean 向 Spring IOC 容器注册别名
protected void processAliasRegistration(Element ele) {
    //获取<Alias>别名元素中 name 的属性值
    String name = ele.getAttribute(NAME_ATTRIBUTE);
    //获取<Alias>别名元素中 alias 的属性值
    String alias = ele.getAttribute(ALIAS_ATTRIBUTE);
    boolean valid = true;
    //<alias>别名元素的 name 属性值为空
    if (!StringUtils.hasText(name)) {
        getReaderContext().error("Name must not be empty", ele);
        valid = false;
    }
    //<alias>别名元素的 alias 属性值为空
    if (!StringUtils.hasText(alias)) {
        getReaderContext().error("Alias must not be empty", ele);
        valid = false;
    }
    if (valid) {
        try {
            //向容器的资源读入器注册别名
            getReaderContext().getRegistry().registerAlias(name, alias);
        } catch (Exception ex) {
            getReaderContext().error("Failed to register alias '" + alias + "' for bean with name '" + name + "'", ele, ex);
        }
        //在解析完<Alias>元素之后,发送容器别名处理完成事件
        getReaderContext().fireAliasRegistered(name, alias, extractSource(ele));
    }
}

//解析 Bean 配置资源 Document 对象的普通元素
protected void processBeanDefinition(Element ele, BeanDefinitionParserDelegate delegate) {
    BeanDefinitionHolder bdHolder = delegate.parseBeanDefinitionElement(ele);
    // BeanDefinitionHolder 是对 BeanDefinition 的封装,即 Bean 定义的封装类
    //对 Document 对象中<Bean>元素的解析由 BeanDefinitionParserDelegate 实现
    // BeanDefinitionHolder bdHolder = delegate.parseBeanDefinitionElement(ele);
    if (bdHolder != null) {
        bdHolder = delegate.decorateBeanDefinitionIfRequired(ele, bdHolder);
        try {
            //向 Spring IOC 容器注册解析得到的 Bean 定义,这是 Bean 定义向 IOC 容器注册的入口
            BeanDefinitionReaderUtils.registerBeanDefinition(bdHolder, getReaderContext().getRegistry());
        }
        catch (BeanDefinitionStoreException ex) {
            getReaderContext().error("Failed to register bean definition with name '" + bdHolder.getBeanName() + "'", ele, ex);
        }
        //在完成向 Spring IOC 容器注册解析得到的 Bean 定义之后,发送注册事件
        getReaderContext().fireComponentRegistered(new BeanComponentDefinition(bdHolder));
    }
}
通过上述 Spring IOC 容器对载入的 Bean 定义 Document 解析可以看出,我们使用 Spring 时,在 Spring 配置文件中可以使用<import>元素来导入 IOC 容器所需要的其他资源,Spring IOC 容器在解析时会首先将指定导入的资源加载进容器中。使用<ailas>别名时,Spring IOC 容器首先将别名元素所定义的别名注册到容器中。
对于既不是<import>元素,又不是<alias>元素的元素,即 Spring 配置文件中普通的<bean>元素的解析由 BeanDefinitionParserDelegate 类的 parseBeanDefinitionElement() 方法来实现。这个解析的过程非常复杂,我们在 mini 版本的时候,就用 properties 文件代替了。
12、载入<bean>元素
Bean 配置信息中的<import>和<alias>元素解析在 DefaultBeanDefinitionDocumentReader 中已经完成,对 Bean 配置信息中使用最多的<bean>元素交由 BeanDefinitionParserDelegate 来解析,其解析实现的源码如下:
//解析<Bean>元素的入口
@Nullable
public BeanDefinitionHolder parseBeanDefinitionElement(Element ele) {
    return parseBeanDefinitionElement(ele, null);
}

//解析 Bean 配置信息中的<Bean>元素,这个方法中主要处理<Bean>元素的 id,name 和别名属性
@Nullable
public BeanDefinitionHolder parseBeanDefinitionElement(Element ele, @Nullable BeanDefinition containingBean) {
    //获取<Bean>元素中的 id 属性值
    String id = ele.getAttribute(ID_ATTRIBUTE);
    //获取<Bean>元素中的 name 属性值
    String nameAttr = ele.getAttribute(NAME_ATTRIBUTE);

    //获取<Bean>元素中的 alias 属性值
    List<String> aliases = new ArrayList<>();

    //将<Bean>元素中的所有 name 属性值存放到别名中
    if (StringUtils.hasLength(nameAttr)) {
        String[] nameArr = StringUtils.tokenizeToStringArray(nameAttr,                  MULTI_VALUE_ATTRIBUTE_DELIMITERS);
        aliases.addAll(Arrays.asList(nameArr));
    }

    String beanName = id;
    //如果<Bean>元素中没有配置 id 属性时,将别名中的第一个值赋值给 beanName
    if (!StringUtils.hasText(beanName) && !aliases.isEmpty()) {
        beanName = aliases.remove(0);
        if (logger.isDebugEnabled()) {
            logger.debug("No XML 'id' specified - using '" + beanName + "' as bean name and " + aliases + " as aliases");
        }
    }

    //检查<Bean>元素所配置的 id 或者 name 的唯一性,containingBean 标识<Bean>
    //元素中是否包含子<Bean>元素
    if (containingBean == null) {
        //检查<Bean>元素所配置的 id、name 或者别名是否重复
        checkNameUniqueness(beanName, aliases, ele);
    }

    //详细对<Bean>元素中配置的 Bean 定义进行解析的地方
    AbstractBeanDefinition beanDefinition = parseBeanDefinitionElement(ele, beanName, containingBean);
    if (beanDefinition != null) {
        if (!StringUtils.hasText(beanName)) {
            try {
                if (containingBean != null) {
                    //如果<Bean>元素中没有配置 id、别名或者 name,且没有包含子元素
                    //<Bean>元素,为解析的 Bean 生成一个唯一 beanName 并注册
                    beanName = BeanDefinitionReaderUtils.generateBeanName(
                        beanDefinition, this.readerContext.getRegistry(), true);
                }
                else {
                    //如果<Bean>元素中没有配置 id、别名或者 name,且包含了子元素
                    //<Bean>元素,为解析的 Bean 使用别名向 IOC 容器注册
                    beanName = this.readerContext.generateBeanName(beanDefinition);
                    // Register an alias for the plain bean class name, if still possible,
                    // if the generator returned the class name plus a suffix.
                    // This is expected for Spring 1.2/2.0 backwards compatibility.
                    //为解析的 Bean 使用别名注册时,为了向后兼容
                    //Spring1.2/2.0,给别名添加类名后缀
                    String beanClassName = beanDefinition.getBeanClassName();
                    if (beanClassName != null &&
                        beanName.startsWith(beanClassName) && beanName.length() > beanClassName.length() && !this.readerContext.getRegistry().isBeanNameInUse(beanClassName)) {
                        aliases.add(beanClassName);
                    }
                }
                if (logger.isDebugEnabled()) {
                    logger.debug("Neither XML 'id' nor 'name' specified - " + "using generated bean name [" + beanName + "]");
                }
            } catch (Exception ex) {
                error(ex.getMessage(), ele);
                return null;
            }
        }
        String[] aliasesArray = StringUtils.toStringArray(aliases);
        return new BeanDefinitionHolder(beanDefinition, beanName, aliasesArray);
    }
    //当解析出错时,返回 null
    return null;

}

protected void checkNameUniqueness(String beanName, List<String> aliases, Element beanElement) {
    String foundName = null;

    if (StringUtils.hasText(beanName) && this.usedNames.contains(beanName)) {
        foundName = beanName;
    }
    if (foundName == null) {
        foundName = CollectionUtils.findFirstMatch(this.usedNames, aliases);
    }
    if (foundName != null) {
        error("Bean name '" + foundName + "' is already used in this <beans> element", beanElement);
    }

    this.usedNames.add(beanName);
    this.usedNames.addAll(aliases);

}

//详细对<Bean>元素中配置的 Bean 定义其他属性进行解析
//由于上面的方法中已经对 Bean 的 id、name 和别名等属性进行了处理
//该方法中主要处理除这三个以外的其他属性数据
@Nullable
public AbstractBeanDefinition parseBeanDefinitionElement(
    Element ele, String beanName, @Nullable BeanDefinition containingBean) {
    //记录解析的<Bean>
    this.parseState.push(new BeanEntry(beanName));

    //这里只读取<Bean>元素中配置的 class 名字,然后载入到 BeanDefinition 中去
    //只是记录配置的 class 名字,不做实例化,对象的实例化在依赖注入时完成
    String className = null;

    //如果<Bean>元素中配置了 parent 属性,则获取 parent 属性的值
    if (ele.hasAttribute(CLASS_ATTRIBUTE)) {
        className = ele.getAttribute(CLASS_ATTRIBUTE).trim();
    }
    String parent = null;
    if (ele.hasAttribute(PARENT_ATTRIBUTE)) {
        parent = ele.getAttribute(PARENT_ATTRIBUTE);

    }

    try {
        //根据<Bean>元素配置的 class 名称和 parent 属性值创建 BeanDefinition
        //为载入 Bean 定义信息做准备
        AbstractBeanDefinition bd = createBeanDefinition(className, parent);

        //对当前的<Bean>元素中配置的一些属性进行解析和设置,如配置的单态(singleton)属性等
        parseBeanDefinitionAttributes(ele, beanName, containingBean, bd);
        //为<Bean>元素解析的 Bean 设置 description 信息
        bd.setDescription(DomUtils.getChildElementValueByTagName(ele, DESCRIPTION_ELEMENT));

        //对<Bean>元素的 meta(元信息)属性解析
        parseMetaElements(ele, bd);
        //对<Bean>元素的 lookup-Method 属性解析
        parseLookupOverrideSubElements(ele, bd.getMethodOverrides());
        //对<Bean>元素的 replaced-Method 属性解析
        parseReplacedMethodSubElements(ele, bd.getMethodOverrides());

        //解析<Bean>元素的构造方法设置
        parseConstructorArgElements(ele, bd);
        //解析<Bean>元素的<property>设置
        parsePropertyElements(ele, bd);
        //解析<Bean>元素的 qualifier 属性
        parseQualifierElements(ele, bd);

        //为当前解析的 Bean 设置所需的资源和依赖对象
        bd.setResource(this.readerContext.getResource());
        bd.setSource(extractSource(ele));

        return bd;

    } catch (ClassNotFoundException ex) {
        error("Bean class [" + className + "] not found", ele, ex);
    } catch (NoClassDefFoundError err) {
        error("Class that bean class [" + className + "] depends on not found", ele, err);
    } catch (Throwable ex) {
        error("Unexpected failure during bean definition parsing", ele, ex);
    } finally {
        this.parseState.pop();
    }

    //解析<Bean>元素出错时,返回 null
    return null;
}
只要使用过 Spring,对 Spring 配置文件比较熟悉的人,通过对上述源码的分析,就会明白我们在 Spring 配置文件中<Bean>元素的中配置的属性就是通过该方法解析和设置到 Bean 中去的。
注意:在解析<Bean>元素过程中没有创建和实例化 Bean 对象,只是创建了 Bean 对象的定义类BeanDefinition,将<Bean>元素中的配置信息设置到 BeanDefinition 中作为记录,当依赖注入时才使用这些记录信息创建和实例化具体的 Bean 对象。
上面方法中一些对一些配置如元信息(meta)、qualifier 等的解析,我们在 Spring 中配置时使用的也不多,我们在使用 Spring 的<Bean>元素时,配置最多的是<property>属性,因此我们下面继续分析源码,了解 Bean 的属性在解析时是如何设置的。
13、载入<property>元素
BeanDefinitionParserDelegate 在解析<Bean>调用 parsePropertyElements() 方法解析<Bean>元素中的<property>属性子元素,解析源码如下:
//解析<Bean>元素中的<property>子元素
public void parsePropertyElements(Element beanEle, BeanDefinition bd) {
    //获取<Bean>元素中所有的子元素
    NodeList nl = beanEle.getChildNodes();
    for (int i = 0; i < nl.getLength(); i++) {
        Node node = nl.item(i);
        //如果子元素是<property>子元素,则调用解析<property>子元素方法解析
        if (isCandidateElement(node) && nodeNameEquals(node, PROPERTY_ELEMENT)) {
            parsePropertyElement((Element) node, bd);
        }
    }
}

//解析<property>元素
public void parsePropertyElement(Element ele, BeanDefinition bd) {
    //获取<property>元素的名字
    String propertyName = ele.getAttribute(NAME_ATTRIBUTE);
    if (!StringUtils.hasLength(propertyName)) {
        error("Tag 'property' must have a 'name' attribute", ele);
        return;
    }
    this.parseState.push(new PropertyEntry(propertyName));
    try {
        //如果一个 Bean 中已经有同名的 property 存在,则不进行解析,直接返回。
        //即如果在同一个 Bean 中配置同名的 property,则只有第一个起作用
        if (bd.getPropertyValues().contains(propertyName)) {
            error("Multiple 'property' definitions for property '" + propertyName + "'", ele);
            return;
        }
        //解析获取 property 的值
        Object val = parsePropertyValue(ele, bd, propertyName);
        //根据 property 的名字和值创建 property 实例
        PropertyValue pv = new PropertyValue(propertyName, val);
        //解析<property>元素中的属性
        parseMetaElements(ele, pv);
        pv.setSource(extractSource(ele));
        bd.getPropertyValues().addPropertyValue(pv);
    } finally {
        this.parseState.pop();
    }

}

//解析获取 property 值
@Nullable
public Object parsePropertyValue(Element ele, BeanDefinition bd, @Nullable String propertyName) {
    String elementName = (propertyName != null) ? "<property> element for property '" + propertyName + "'" : "<constructor-arg> element";
    //获取<property>的所有子元素,只能是其中一种类型:ref,value,list,etc 等
    NodeList nl = ele.getChildNodes();
    Element subElement = null;
    for (int i = 0; i < nl.getLength(); i++) {
        Node node = nl.item(i);
        //子元素不是 description 和 meta 属性
        if (node instanceof Element && !nodeNameEquals(node, DESCRIPTION_ELEMENT) &&
            !nodeNameEquals(node, META_ELEMENT)) {
            // Child element is what we're looking for.
            if (subElement != null) {
                error(elementName + " must not contain more than one sub-element", ele);
            }
            else {
                //当前<property>元素包含有子元素
                subElement = (Element) node;
            }
        }
    }

    //判断 property 的属性值是 ref 还是 value,不允许既是 ref 又是 value
    boolean hasRefAttribute = ele.hasAttribute(REF_ATTRIBUTE);
    boolean hasValueAttribute = ele.hasAttribute(VALUE_ATTRIBUTE);
    if ((hasRefAttribute && hasValueAttribute) ||
        ((hasRefAttribute || hasValueAttribute) && subElement != null)) {
        error(elementName + " is only allowed to contain either 'ref' attribute OR 'value' attribute OR sub-element", ele);
    }

    //如果属性是 ref,创建一个 ref 的数据对象 RuntimeBeanReference
    //这个对象封装了 ref 信息
    if (hasRefAttribute) {
        String refName = ele.getAttribute(REF_ATTRIBUTE);
        if (!StringUtils.hasText(refName)) {
            error(elementName + " contains empty 'ref' attribute", ele);
        }
        //一个指向运行时所依赖对象的引用
        RuntimeBeanReference ref = new RuntimeBeanReference(refName);
        //设置这个 ref 的数据对象是被当前的 property 对象所引用
        ref.setSource(extractSource(ele));
        return ref;
    }
    //如果属性是 value,创建一个 value 的数据对象 TypedStringValue
    //这个对象封装了 value 信息
    else if (hasValueAttribute) {
        //一个持有 String 类型值的对象
        TypedStringValue valueHolder = new TypedStringValue(ele.getAttribute(VALUE_ATTRIBUTE));
        //设置这个 value 数据对象是被当前的 property 对象所引用
        valueHolder.setSource(extractSource(ele));
        return valueHolder;
    }
    //如果当前<property>元素还有子元素
    else if (subElement != null) {
        //解析<property>的子元素
        return parsePropertySubElement(subElement, bd);
    }
    else {
        //propery 属性中既不是 ref,也不是 value 属性,解析出错返回 null
        error(elementName + " must specify a ref or value", ele);
        return null;
    }
}
通过对上述源码的分析,我们可以了解在 Spring 配置文件中,<Bean>元素中<property>元素的相关配置是如何处理的:
- ref 被封装为指向依赖对象一个引用。
- value 配置都会封装成一个字符串类型的对象。
- ref 和 value 都通过"解析的数据类型属性值.setSource(extractSource(ele));"方法将属性值/引用与所引用的属性关联起来。
在方法的最后对于<property>元素的子元素通过 parsePropertySubElement ()方法解析,我们继续分析该方法的源码,了解其解析过程。
14、载入<property>的子元素
在 BeanDefinitionParserDelegate 类中的 parsePropertySubElement()方法对<property>中的子元素解析,源码如下:
//解析<property>元素中 ref,value 或者集合等子元素
@Nullable
public Object parsePropertySubElement(Element ele, @Nullable BeanDefinition bd, @Nullable String defaultValueType) {
    //如果<property>没有使用 Spring 默认的命名空间,则使用用户自定义的规则解析内嵌元素
    if (!isDefaultNamespace(ele)) {
        return parseNestedCustomElement(ele, bd);
    }
    //如果子元素是 bean,则使用解析<Bean>元素的方法解析
    else if (nodeNameEquals(ele, BEAN_ELEMENT)) {
        BeanDefinitionHolder nestedBd = parseBeanDefinitionElement(ele, bd);
        if (nestedBd != null) {
            nestedBd = decorateBeanDefinitionIfRequired(ele, nestedBd, bd);
        }
        return nestedBd;
    }
    //如果子元素是 ref,ref 中只能有以下 3 个属性:bean、local、parent
    else if (nodeNameEquals(ele, REF_ELEMENT)) {
        //可以不再同一个 Spring 配置文件中,具体请参考 Spring 对 ref 的配置规则
        String refName = ele.getAttribute(BEAN_REF_ATTRIBUTE);
        boolean toParent = false;
        if (!StringUtils.hasLength(refName)) {
            //获取<property>元素中 parent 属性值,引用父级容器中的 Bean
            refName = ele.getAttribute(PARENT_REF_ATTRIBUTE);
            toParent = true;
            if (!StringUtils.hasLength(refName)) {
                error("'bean' or 'parent' is required for <ref> element", ele);
                return null;
            }
        }
        if (!StringUtils.hasText(refName)) {
            error("<ref> element contains empty target attribute", ele);
            return null;
        }
        //创建 ref 类型数据,指向被引用的对象
        RuntimeBeanReference ref = new RuntimeBeanReference(refName, toParent);
        //设置引用类型值是被当前子元素所引用
        ref.setSource(extractSource(ele));
        return ref;
    }
    //如果子元素是<idref>,使用解析 ref 元素的方法解析
    else if (nodeNameEquals(ele, IDREF_ELEMENT)) {
        return parseIdRefElement(ele);
    }
    //如果子元素是<value>,使用解析 value 元素的方法解析
    else if (nodeNameEquals(ele, VALUE_ELEMENT)) {
        return parseValueElement(ele, defaultValueType);
    }
    //如果子元素是 null,为<property>设置一个封装 null 值的字符串数据
    else if (nodeNameEquals(ele, NULL_ELEMENT)) {
        TypedStringValue nullHolder = new TypedStringValue(null);
        nullHolder.setSource(extractSource(ele));
        return nullHolder;
    }
    //如果子元素是<array>,使用解析 array 集合子元素的方法解析
    else if (nodeNameEquals(ele, ARRAY_ELEMENT)) {
        return parseArrayElement(ele, bd);
    }
    //如果子元素是<list>,使用解析 list 集合子元素的方法解析
    else if (nodeNameEquals(ele, LIST_ELEMENT)) {
        return parseListElement(ele, bd);
    }
    //如果子元素是<set>,使用解析 set 集合子元素的方法解析
    else if (nodeNameEquals(ele, SET_ELEMENT)) {
        return parseSetElement(ele, bd);
    }
    //如果子元素是<map>,使用解析 map 集合子元素的方法解析
    else if (nodeNameEquals(ele, MAP_ELEMENT)) {
        return parseMapElement(ele, bd);
    }
    //如果子元素是<props>,使用解析 props 集合子元素的方法解析
    else if (nodeNameEquals(ele, PROPS_ELEMENT)) {
        return parsePropsElement(ele);
    }
    //既不是 ref,又不是 value,也不是集合,则子元素配置错误,返回 null
    else {
        error("Unknown property sub-element: [" + ele.getNodeName() + "]", ele);
        return null;
    }
}
通过上述源码分析,我们明白了在 Spring 配置文件中,对<property>元素中配置的 array、list、set、map、prop 等各种集合子元素的都通过上述方法解析,生成对应的数据对象,比如 ManagedList、ManagedArray、ManagedSet 等,这些 Managed 类是 Spring 对象 BeanDefiniton 的数据封装,对集合数据类型的具体解析有各自的解析方法实现,解析方法的命名非常规范,一目了然,我们对<list>集合元素的解析方法进行源码分析,了解其实现过程。
15、载入<list>的子元素
在 BeanDefinitionParserDelegate 类中的 parseListElement()方法就是具体实现解析<property>元素中的<list>集合子元素,源码如下:
//解析<list>集合子元素
public List<Object> parseListElement(Element collectionEle, @Nullable BeanDefinition bd) {
    //获取<list>元素中的 value-type 属性,即获取集合元素的数据类型
    String defaultElementType = collectionEle.getAttribute(VALUE_TYPE_ATTRIBUTE);
    //获取<list>集合元素中的所有子节点
    NodeList nl = collectionEle.getChildNodes();
    //Spring 中将 List 封装为 ManagedList
    ManagedList<Object> target = new ManagedList<>(nl.getLength());
    target.setSource(extractSource(collectionEle));
    //设置集合目标数据类型
    target.setElementTypeName(defaultElementType);
    target.setMergeEnabled(parseMergeAttribute(collectionEle));
    //具体的<list>元素解析
    parseCollectionElements(nl, target, bd, defaultElementType);
    return target;
}

//具体解析<list>集合元素,<array>、<list>和<set>都使用该方法解析
protected void parseCollectionElements(
    NodeList elementNodes, Collection<Object> target, @Nullable BeanDefinition bd, String defaultElementType){
    //遍历集合所有节点
    for (int i = 0; i < elementNodes.getLength(); i++) {
        Node node = elementNodes.item(i);
        //节点不是 description 节点
        if (node instanceof Element && !nodeNameEquals(node, DESCRIPTION_ELEMENT)) {
            //将解析的元素加入集合中,递归调用下一个子元素
            target.add(parsePropertySubElement((Element) node, bd, defaultElementType));
        }
    }
}
经过对 Spring Bean 配置信息转换的 Document 对象中的元素层层解析,Spring IOC 现在已经将 XML 形式定义的 Bean 配置信息转换为 Spring IOC 所识别的数据结构------BeanDefinition,它是 Bean 配置信息中配置的 POJO 对象在 Spring IOC 容器中的映射,我们可以通过 AbstractBeanDefinition 为入口,看到了 IOC 容器进行索引、查询和操作。
通过 Spring IOC 容器对 Bean 配置资源的解析后,IOC 容器大致完成了管理 Bean 对象的准备工作,即初始化过程,但是最为重要的依赖注入还没有发生,现在在 IOC 容器中 BeanDefinition 存储的只是一些静态信息,接下来需要向容器注册 Bean 定义信息才能全部完成 IOC 容器的初始化过程
16、分配注册策略
让我们继续跟踪程序的执行顺序,接下来我们来分析 DefaultBeanDefinitionDocumentReader 对 Bean 定义转换的 Document 对象解析的流程中,在其 parseDefaultElement() 方法中完成对Document 对象的解析后得到封装BeanDefinition 的 BeanDefinitionHold 对象,然后调用 BeanDefinitionReaderUtils 的 registerBeanDefinition() 方法向IOC容器注册解析的 Bean ,BeanDefinitionReaderUtils 的注册的源码如下:
//将解析的 BeanDefinitionHold 注册到容器中
public static void registerBeanDefinition(
    BeanDefinitionHolder definitionHolder, BeanDefinitionRegistry registry)
    throws BeanDefinitionStoreException {
    //获取解析的 BeanDefinition 的名称
    String beanName = definitionHolder.getBeanName();
    //向 IOC 容器注册 BeanDefinition
    registry.registerBeanDefinition(beanName, definitionHolder.getBeanDefinition());
    //如果解析的 BeanDefinition 有别名,向容器为其注册别名
    String[] aliases = definitionHolder.getAliases();
    if (aliases != null) {
        for (String alias : aliases) {
            registry.registerAlias(beanName, alias);
        }
    }
}
当调用 BeanDefinitionReaderUtils 向 IOC 容器注册解析的 BeanDefinition 时,真正完成注册功能的
是 DefaultListableBeanFactory。
17、向容器注册
DefaultListableBeanFactory 中使用一个HashMap 的集合对象存放 IOC 容器中注册解析的 BeanDefinition,向 IOC 容器注册的主要源码如下:

//存储注册信息的 BeanDefinition
private final Map<String, BeanDefinition> beanDefinitionMap = new ConcurrentHashMap<>(256);

//向 IOC 容器注册解析的 BeanDefiniton
@Override
public void registerBeanDefinition(String beanName, BeanDefinition beanDefinition)
    throws BeanDefinitionStoreException {

    Assert.hasText(beanName, "Bean name must not be empty");
    Assert.notNull(beanDefinition, "BeanDefinition must not be null");

    //校验解析的 BeanDefiniton
    if (beanDefinition instanceof AbstractBeanDefinition) {
        try {
            ((AbstractBeanDefinition) beanDefinition).validate();
        } catch (BeanDefinitionValidationException ex) {
            throw new  BeanDefinitionStoreException(beanDefinition.getResourceDescription(), beanName, "Validation of bean definition failed", ex);
        }
    }

    BeanDefinition oldBeanDefinition;
    oldBeanDefinition = this.beanDefinitionMap.get(beanName);

    if (oldBeanDefinition != null) {
        if (!isAllowBeanDefinitionOverriding()) {
            throw new BeanDefinitionStoreException(beanDefinition.getResourceDescription(), beanName, "Cannot register bean definition [" + beanDefinition + "] for bean '" + beanName + "': There is already [" + oldBeanDefinition + "] bound.");
        } else if (oldBeanDefinition.getRole() < beanDefinition.getRole()) {
            // e.g. was ROLE_APPLICATION, now overriding with ROLE_SUPPORT or ROLE_INFRASTRUCTURE
            if (this.logger.isWarnEnabled()) {
                this.logger.warn("Overriding user-defined bean definition for bean '" + beanName + "' with a framework-generated bean definition: replacing [" + oldBeanDefinition + "] with [" + beanDefinition + "]");
            }
        } else if (!beanDefinition.equals(oldBeanDefinition)) {
            if (this.logger.isInfoEnabled()) {
                this.logger.info("Overriding bean definition for bean '" + beanName + "' with a different definition: replacing [" + oldBeanDefinition + "] with [" + beanDefinition + "]");
            }
        } else {
            if (this.logger.isDebugEnabled()) {
                this.logger.debug("Overriding bean definition for bean '" + beanName + "' with an equivalent definition: replacing [" + oldBeanDefinition + "] with [" + beanDefinition + "]");
            }
        }
        this.beanDefinitionMap.put(beanName, beanDefinition);
    } else {
        if (hasBeanCreationStarted()) {
            //注册的过程中需要线程同步,以保证数据的一致性
            synchronized (this.beanDefinitionMap) {
                this.beanDefinitionMap.put(beanName, beanDefinition);
                List<String> updatedDefinitions = new ArrayList<>(this.beanDefinitionNames.size() + 1);
                updatedDefinitions.addAll(this.beanDefinitionNames);
                updatedDefinitions.add(beanName);
                this.beanDefinitionNames = updatedDefinitions;
                if (this.manualSingletonNames.contains(beanName)) {
                    Set<String> updatedSingletons = new LinkedHashSet<>(this.manualSingletonNames);
                    updatedSingletons.remove(beanName);
                    this.manualSingletonNames = updatedSingletons;
                }
            }
        } else {
            this.beanDefinitionMap.put(beanName, beanDefinition);
            this.beanDefinitionNames.add(beanName);
            this.manualSingletonNames.remove(beanName);
        }
        this.frozenBeanDefinitionNames = null;
    }

    //检查是否有同名的 BeanDefinition 已经在 IOC 容器中注册
    if (oldBeanDefinition != null || containsSingleton(beanName)) {
        //重置所有已经注册过的 BeanDefinition 的缓存
        resetBeanDefinition(beanName);
    }
}
至此,Bean 配置信息中配置的 Bean 被解析过后,已经注册到 IOC 容器中,被容器管理起来,真正完成了 IOC 容器初始化所做的全部工作。现在 IOC 容器中已经建立了整个 Bean 的配置信息,这些 BeanDefinition 信息已经可以使用,并且可以被检索,IOC 容器的作用就是对这些注册的 Bean 定义信息进行处理和维护。这些的注册的 Bean 定义信息是 IOC 容器控制反转的基础,正是有了这些注册的数据,容器才可以进行依赖注入。
基于 Annotation 的 IOC 初始化
Annotation 的前世今生
从 Spring2.0 以后的版本中,Spring 也引入了基于注解(Annotation)方式的配置,注解(Annotation) 是 JDK1.5 中引入的一个新特性,用于简化 Bean 的配置,可以取代 XML 配置文件。开发人员对注解 (Annotation) 的态度也是萝卜青菜各有所爱,个人认为注解可以大大简化配置,提高开发速度,但也给后期维护增加了难度。目前来说 XML 方式发展的相对成熟,方便于统一管理。
随着 Spring Boot 的兴起,基于注解的开发甚至实现了零配置。但作为个人的习惯而言,还是倾向于 XML 配置文件和注解 (Annotation)相互配合使用。Spring IOC 容器对于类级别的注解和类内部的注解分以下两种处理策略:
1)、类级别的注解:如@Component、@Repository 、@Controller、@Service 以及 JavaEE6 的@ManagedBean 和 @Named 注解,都是添加在类上面的类级别注解,Spring 容器根据注解的过滤规则扫描读取注解 Bean 定义类,并将其注册到 Spring IOC 容器中。
2)、类内部的注解:如@Autowire、@Value、@Resource 以及 EJB 和 WebService 相关的注解等,都是添加在类内部的字段或者方法上的类内部注解,SpringIOC 容器通过 Bean 后置注解处理器解析Bean 内部的注解。下面将根据这两种处理策略,分别分析 Spring 处理注解相关的源码。
定位 Bean 扫描路径
在Spring中管理注解Bean定义的容器有两个 : AnnotationConfigApplicationContext 和
AnnotationConfigWebApplicationContex。这两个类是专门处理 Spring 注解方式配置的容器,直接依赖于注解作为容器配置信息来源的 IOC 容器。AnnotationConfigWebApplicationContext 是AnnotationConfigApplicationContext 的 Web 版本,两者的用法以及对注解的处理方式几乎没有差别。现在我们以 AnnotationConfigApplicationContext 为例看看它的源码:
public class AnnotationConfigApplicationContext extends GenericApplicationContext implements  AnnotationConfigRegistry {

    //保存一个读取注解的 Bean 定义读取器,并将其设置到容器中
    private final AnnotatedBeanDefinitionReader reader;

    //保存一个扫描指定类路径中注解 Bean 定义的扫描器,并将其设置到容器中
    private final ClassPathBeanDefinitionScanner scanner;

    //默认构造函数,初始化一个空容器,容器不包含任何 Bean 信息,需要在稍后通过调用其 register()
    //方法注册配置类,并调用 refresh()方法刷新容器,触发容器对注解 Bean 的载入、解析和注册过程
    public AnnotationConfigApplicationContext() {
        this.reader = new AnnotatedBeanDefinitionReader(this);
        this.scanner = new ClassPathBeanDefinitionScanner(this);
    }
    public AnnotationConfigApplicationContext(DefaultListableBeanFactory beanFactory) {
        super(beanFactory);
        this.reader = new AnnotatedBeanDefinitionReader(this);
        this.scanner = new ClassPathBeanDefinitionScanner(this);
    }

    //最常用的构造函数,通过将涉及到的配置类传递给该构造函数,以实现将相应配置类中的 Bean 自动注册到容器中
    public AnnotationConfigApplicationContext(Class<?>... annotatedClasses) {
        this();
        register(annotatedClasses);
        refresh();
    }

    //该构造函数会自动扫描以给定的包及其子包下的所有类,并自动识别所有的 Spring Bean,将其注册到容器中
    public AnnotationConfigApplicationContext(String... basePackages) {
        this();
        scan(basePackages);
        refresh();
    }

    @Override
    public void setEnvironment(ConfigurableEnvironment environment) {
        super.setEnvironment(environment);
        this.reader.setEnvironment(environment);
        this.scanner.setEnvironment(environment);
    }

    //为容器的注解 Bean 读取器和注解 Bean 扫描器设置 Bean 名称产生器
    public void setBeanNameGenerator(BeanNameGenerator beanNameGenerator) {
        this.reader.setBeanNameGenerator(beanNameGenerator);
        this.scanner.setBeanNameGenerator(beanNameGenerator);
        getBeanFactory().registerSingleton(
            AnnotationConfigUtils.CONFIGURATION_BEAN_NAME_GENERATOR, beanNameGenerator);
    }

    //为容器的注解 Bean 读取器和注解 Bean 扫描器设置作用范围元信息解析器
    public void setScopeMetadataResolver(ScopeMetadataResolver scopeMetadataResolver) {
        this.reader.setScopeMetadataResolver(scopeMetadataResolver);
        this.scanner.setScopeMetadataResolver(scopeMetadataResolver);
    }

    //为容器注册一个要被处理的注解 Bean,新注册的 Bean,必须手动调用容器的
    //refresh()方法刷新容器,触发容器对新注册的 Bean 的处理
    public void register(Class<?>... annotatedClasses) {
        Assert.notEmpty(annotatedClasses, "At least one annotated class must be specified");
        this.reader.register(annotatedClasses);

    }

    //扫描指定包路径及其子包下的注解类,为了使新添加的类被处理,必须手动调用
    //refresh()方法刷新容器
    public void scan(String... basePackages) {
        Assert.notEmpty(basePackages, "At least one base package must be specified");
        this.scanner.scan(basePackages);
    }

    // ...
}
通过上面的源码分析,我们可以看啊到 Spring 对注解的处理分为两种方式:
- 直接将注解 Bean 注册到容器中
可以在初始化容器时注册;也可以在容器创建之后手动调用注册方法向容器注册,然后通过手动刷新容器,使得容器对注册的注解 Bean 进行处理。 - 通过扫描指定的包及其子包下的所有类
在初始化注解容器时指定要自动扫描的路径,如果容器创建以后向给定路径动态添加了注解 Bean,则需要手动调用容器扫描的方法,然后手动刷新容器,使得容器对所注册的 Bean 进行处理。
接下来,将会对两种处理方式详细分析其实现过程。
读取 Annotation 元数据
当创建注解处理容器时,如果传入的初始参数是具体的注解 Bean 定义类时,注解容器读取并注册。
1)、AnnotationConfigApplicationContext 通过调用注解 Bean 定义读取器
AnnotatedBeanDefinitionReader 的 register()方法向容器注册指定的注解 Bean,注解 Bean 定义读取器向容器注册注解 Bean 的源码如下:
//注册多个注解 Bean 定义类
public void register(Class<?>... annotatedClasses) {
    for (Class<?> annotatedClass : annotatedClasses) {
        registerBean(annotatedClass);
    }
}

//注册一个注解 Bean 定义类
public void registerBean(Class<?> annotatedClass) {
    doRegisterBean(annotatedClass, null, null, null);
}

public <T> void registerBean(Class<T> annotatedClass, @Nullable Supplier<T> instanceSupplier) {
    doRegisterBean(annotatedClass, instanceSupplier, null, null);
}

public <T> void registerBean(Class<T> annotatedClass, String name, @Nullable Supplier<T> instanceSupplier) {
    doRegisterBean(annotatedClass, instanceSupplier, name, null);
}

//Bean 定义读取器注册注解 Bean 定义的入口方法
@SuppressWarnings("unchecked")
public void registerBean(Class<?> annotatedClass, Class<? extends Annotation>... qualifiers) {
    doRegisterBean(annotatedClass, null, null, qualifiers);
}

//Bean 定义读取器向容器注册注解 Bean 定义类
@SuppressWarnings("unchecked")
public void registerBean(Class<?> annotatedClass, String name, Class<? extends Annotation>... qualifiers) {
    doRegisterBean(annotatedClass, null, name, qualifiers);
}

//Bean 定义读取器向容器注册注解 Bean 定义类
<T> void doRegisterBean(Class<T> annotatedClass, @Nullable Supplier<T> instanceSupplier, @Nullable String name, @Nullable Class<? extends Annotation>[] qualifiers, BeanDefinitionCustomizer... definitionCustomizers) {

    //根据指定的注解 Bean 定义类,创建 Spring 容器中对注解 Bean 的封装的数据结构
    AnnotatedGenericBeanDefinition abd = new AnnotatedGenericBeanDefinition(annotatedClass);
    if (this.conditionEvaluator.shouldSkip(abd.getMetadata())) {
        return;
    }

    abd.setInstanceSupplier(instanceSupplier);
    //解析注解 Bean 定义的作用域,若@Scope("prototype"),则 Bean 为原型类型;
    //若@Scope("singleton"),则 Bean 为单态类型
    ScopeMetadata scopeMetadata = this.scopeMetadataResolver.resolveScopeMetadata(abd);
    //为注解 Bean 定义设置作用域
    abd.setScope(scopeMetadata.getScopeName());
    //为注解 Bean 定义生成 Bean 名称
    String beanName = (name != null ? name : this.beanNameGenerator.generateBeanName(abd, this.registry));

    //处理注解 Bean 定义中的通用注解
    AnnotationConfigUtils.processCommonDefinitionAnnotations(abd);
    //如果在向容器注册注解 Bean 定义时,使用了额外的限定符注解,则解析限定符注解。
    //主要是配置的关于 autowiring 自动依赖注入装配的限定条件,即@Qualifier 注解
    //Spring 自动依赖注入装配默认是按类型装配,如果使用@Qualifier 则按名称
    if (qualifiers != null) {
        for (Class<? extends Annotation> qualifier : qualifiers) {
            //如果配置了@Primary 注解,设置该 Bean 为 autowiring 自动依赖注入装//配时的首选
            if (Primary.class == qualifier) {
                abd.setPrimary(true);
            }
            //如果配置了@Lazy 注解,则设置该 Bean 为非延迟初始化,如果没有配置,
            //则该 Bean 为预实例化
            else if (Lazy.class == qualifier) {
                abd.setLazyInit(true);
            }
            //如果使用了除@Primary 和@Lazy 以外的其他注解,则为该 Bean 添加一
            //个 autowiring 自动依赖注入装配限定符,该 Bean 在进 autowiring
            //自动依赖注入装配时,根据名称装配限定符指定的 Bean
            else {
                abd.addQualifier(new AutowireCandidateQualifier(qualifier));
            }
        }
    }
    for (BeanDefinitionCustomizer customizer : definitionCustomizers) {
        customizer.customize(abd);
    }

    //创建一个指定 Bean 名称的 Bean 定义对象,封装注解 Bean 定义类数据
    BeanDefinitionHolder definitionHolder = new BeanDefinitionHolder(abd, beanName);
    //根据注解 Bean 定义类中配置的作用域,创建相应的代理对象
    definitionHolder = AnnotationConfigUtils.applyScopedProxyMode(scopeMetadata, definitionHolder, this.registry);
    //向 IOC 容器注册注解 Bean 类定义对象
    BeanDefinitionReaderUtils.registerBeanDefinition(definitionHolder, this.registry);
}
从上面的源码我们可以看出,注册注解 Bean 定义类的基本步骤:
a. 需要使用注解元数据解析器解析注解 Bean 中关于作用域的配置。
b. 使用 AnnotationConfigUtils 的 processCommonDefinitionAnnotations()方法处理注解 Bean 定义类中通用的注解。
c. 使用 AnnotationConfigUtils 的 applyScopedProxyMode()方法创建对于作用域的代理对象。
d. 通过 BeanDefinitionReaderUtils 向容器注册 Bean。
下面我们继续分析这 4 步的具体实现过程
2)、AnnotationScopeMetadataResolver 解析作用域元数据
AnnotationScopeMetadataResolver 通过 resolveScopeMetadata()方法解析注解 Bean 定义类的作用域元信息,即判断注册的 Bean 是原生类型(prototype)还是单态(singleton)类型,其源码如下:
//解析注解 Bean 定义类中的作用域元信息
@Override
public ScopeMetadata resolveScopeMetadata(BeanDefinition definition) {
    ScopeMetadata metadata = new ScopeMetadata();
    if (definition instanceof AnnotatedBeanDefinition) {
        AnnotatedBeanDefinition annDef = (AnnotatedBeanDefinition) definition;
        //从注解 Bean 定义类的属性中查找属性为”Scope”的值,即@Scope 注解的值
        //annDef.getMetadata().getAnnotationAttributes 方法将 Bean
        //中所有的注解和注解的值存放在一个 map 集合中
        AnnotationAttributes attributes = AnnotationConfigUtils.attributesFor(
            annDef.getMetadata(), this.scopeAnnotationType);
        //将获取到的@Scope 注解的值设置到要返回的对象中
        if (attributes != null) {
            metadata.setScopeName(attributes.getString("value"));
            //获取@Scope 注解中的 proxyMode 属性值,在创建代理对象时会用到
            ScopedProxyMode proxyMode = attributes.getEnum("proxyMode");
            //如果@Scope 的 proxyMode 属性为 DEFAULT 或者 NO
            if (proxyMode == ScopedProxyMode.DEFAULT) {
                //设置 proxyMode 为 NO
                proxyMode = this.defaultProxyMode;
            }
            //为返回的元数据设置 proxyMode
            metadata.setScopedProxyMode(proxyMode);
        }
    }
    //返回解析的作用域元信息对象
    return metadata;
}
上述代码中的 annDef.getMetadata().getAnnotationAttributes()方法就是获取对象中指定类型的注解的值。
3)、AnnotationConfigUtils 处理注解 Bean 定义类中的通用注解
AnnotationConfigUtils 类的 processCommonDefinitionAnnotations() 在向容器注册 Bean 之前,首先对注解 Bean 定义类中的通用 Spring 注解进行处理,源码如下:
//处理 Bean 定义中通用注解
static void processCommonDefinitionAnnotations(AnnotatedBeanDefinition abd, AnnotatedTypeMetadata metadata) {
    AnnotationAttributes lazy = attributesFor(metadata, Lazy.class);
    //如果 Bean 定义中有@Lazy 注解,则将该 Bean 预实例化属性设置为@lazy 注解的值
    if (lazy != null) {
        abd.setLazyInit(lazy.getBoolean("value"));
    } else if (abd.getMetadata() != metadata) {
        lazy = attributesFor(abd.getMetadata(), Lazy.class);
        if (lazy != null) {
            abd.setLazyInit(lazy.getBoolean("value"));
        }
    }
    //如果 Bean 定义中有@Primary 注解,则为该 Bean 设置为 autowiring 自动依赖注入装配的首选对象
    if (metadata.isAnnotated(Primary.class.getName())) {
        abd.setPrimary(true);
    }
    //如果 Bean 定义中有@ DependsOn 注解,则为该 Bean 设置所依赖的 Bean 名称,
    //容器将确保在实例化该 Bean 之前首先实例化所依赖的 Bean
    AnnotationAttributes dependsOn = attributesFor(metadata, DependsOn.class);
    if (dependsOn != null) {
        abd.setDependsOn(dependsOn.getStringArray("value"));
    }

    if (abd instanceof AbstractBeanDefinition) {
        AbstractBeanDefinition absBd = (AbstractBeanDefinition) abd;
        AnnotationAttributes role = attributesFor(metadata, Role.class);
        if (role != null) {
            absBd.setRole(role.getNumber("value").intValue());
        }
        AnnotationAttributes description = attributesFor(metadata, Description.class);
        if (description != null) {
            absBd.setDescription(description.getString("value"));
        }
    }
}
4)、AnnotationConfigUtils 根据注解 Bean 定义类中配置的作用域为其应用相应的代理策略
AnnotationConfigUtils 类的 applyScopedProxyMode()方法根据注解 Bean 定义类中配置的作用域 @Scope 注解的值,为 Bean 定义应用相应的代理模式,主要是在 Spring 面向切面编程(AOP)中使用。
源码如下:
//根据作用域为 Bean 应用引用的代码模式
static BeanDefinitionHolder applyScopedProxyMode(
    ScopeMetadata metadata, BeanDefinitionHolder definition, BeanDefinitionRegistry registry) {

    //获取注解 Bean 定义类中@Scope 注解的 proxyMode 属性值
    ScopedProxyMode scopedProxyMode = metadata.getScopedProxyMode();
    //如果配置的@Scope 注解的 proxyMode 属性值为 NO,则不应用代理模式
    if (scopedProxyMode.equals(ScopedProxyMode.NO)) {
        return definition;
    }
    //获取配置的@Scope 注解的 proxyMode 属性值,如果为 TARGET_CLASS
    //则返回 true,如果为 INTERFACES,则返回 false
    boolean proxyTargetClass = scopedProxyMode.equals(ScopedProxyMode.TARGET_CLASS);
    //为注册的 Bean 创建相应模式的代理对象
    return ScopedProxyCreator.createScopedProxy(definition, registry, proxyTargetClass);
}
这段为 Bean 引用创建相应模式的代理,这里不做深入的分析。
5)、BeanDefinitionReaderUtils 向容器注册 Bean
BeanDefinitionReaderUtils 主要是校验 BeanDefinition 信息,然后将 Bean 添加到容器中一个管理BeanDefinition 的 HashMap 中。
扫描指定包并解析为 BeanDefinition
当创建注解处理容器时,如果传入的初始参数是注解 Bean 定义类所在的包时,注解容器将扫描给定的包及其子包,将扫描到的注解 Bean 定义载入并注册。
1)、ClassPathBeanDefinitionScanner 扫描给定的包及其子包
AnnotationConfigApplicationContext 通过调用类路径 Bean 定义扫描器
ClassPathBeanDefinitionScanner 扫描给定包及其子包下的所有类,主要源码如下:
public class ClassPathBeanDefinitionScanner extends ClassPathScanningCandidateComponentProvider {

    //创建一个类路径 Bean 定义扫描器
    public ClassPathBeanDefinitionScanner(BeanDefinitionRegistry registry) {
        this(registry, true);
    }

    //为容器创建一个类路径 Bean 定义扫描器,并指定是否使用默认的扫描过滤规则。
    //即 Spring 默认扫描配置:@Component、@Repository、@Service、@Controller
    //注解的 Bean,同时也支持 JavaEE6 的@ManagedBean 和 JSR-330 的@Named 注解
    public ClassPathBeanDefinitionScanner(BeanDefinitionRegistry registry, boolean useDefaultFilters) {
        this(registry, useDefaultFilters, getOrCreateEnvironment(registry));
    }

    public ClassPathBeanDefinitionScanner(BeanDefinitionRegistry registry, boolean useDefaultFilters, Environment environment) {
        this(registry, useDefaultFilters, environment,
             (registry instanceof ResourceLoader ? (ResourceLoader) registry : null));

    }

    public ClassPathBeanDefinitionScanner(BeanDefinitionRegistry registry, boolean useDefaultFilters, Environment environment, @Nullable ResourceLoader resourceLoader) {

        Assert.notNull(registry, "BeanDefinitionRegistry must not be null");
        //为容器设置加载 Bean 定义的注册器
        this.registry = registry;

        if (useDefaultFilters) {
            registerDefaultFilters();
        }
        setEnvironment(environment);
        //为容器设置资源加载器
        setResourceLoader(resourceLoader);
    }

    //调用类路径 Bean 定义扫描器入口方法
    public int scan(String... basePackages) {
        //获取容器中已经注册的 Bean 个数
        int beanCountAtScanStart = this.registry.getBeanDefinitionCount();
        //启动扫描器扫描给定包
        doScan(basePackages);

        // Register annotation config processors, if necessary.
        //注册注解配置(Annotation config)处理器
        if (this.includeAnnotationConfig) {
            AnnotationConfigUtils.registerAnnotationConfigProcessors(this.registry);
        }

        //返回注册的 Bean 个数
        return (this.registry.getBeanDefinitionCount() - beanCountAtScanStart);
    }

    //类路径 Bean 定义扫描器扫描给定包及其子包
    protected Set<BeanDefinitionHolder> doScan(String... basePackages) {
        Assert.notEmpty(basePackages, "At least one base package must be specified");
        //创建一个集合,存放扫描到 Bean 定义的封装类
        Set<BeanDefinitionHolder> beanDefinitions = new LinkedHashSet<>();
        //遍历扫描所有给定的包
        for (String basePackage : basePackages) {
            //调用父类 ClassPathScanningCandidateComponentProvider 的方法
            //扫描给定类路径,获取符合条件的 Bean 定义
            Set<BeanDefinition> candidates = findCandidateComponents(basePackage);
            //遍历扫描到的 Bean
            for (BeanDefinition candidate : candidates) {
                //获取 Bean 定义类中@Scope 注解的值,即获取 Bean 的作用域
                ScopeMetadata scopeMetadata = this.scopeMetadataResolver.resolveScopeMetadata(candidate);
                //为 Bean 设置注解配置的作用域
                candidate.setScope(scopeMetadata.getScopeName());
                //为 Bean 生成名称
                String beanName = this.beanNameGenerator.generateBeanName(candidate, this.registry);
                //如果扫描到的 Bean 不是 Spring 的注解 Bean,则为 Bean 设置默认值,
                //设置 Bean 的自动依赖注入装配属性等
                if (candidate instanceof AbstractBeanDefinition) {
                    postProcessBeanDefinition((AbstractBeanDefinition) candidate, beanName);
                }
                //如果扫描到的 Bean 是 Spring 的注解 Bean,则处理其通用的 Spring 注解
                if (candidate instanceof AnnotatedBeanDefinition) {
                    //处理注解 Bean 中通用的注解,在分析注解 Bean 定义类读取器时已经分析过
 AnnotationConfigUtils.processCommonDefinitionAnnotations((AnnotatedBeanDefinition) candidate);
                }
                //根据 Bean 名称检查指定的 Bean 是否需要在容器中注册,或者在容器中冲突
                if (checkCandidate(beanName, candidate)) {
                    BeanDefinitionHolder definitionHolder = new BeanDefinitionHolder(candidate, beanName);
                    //根据注解中配置的作用域,为 Bean 应用相应的代理模式
                    definitionHolder =
                        AnnotationConfigUtils.applyScopedProxyMode(scopeMetadata, definitionHolder, this.registry);
                    beanDefinitions.add(definitionHolder);
                    //向容器注册扫描到的 Bean
                    registerBeanDefinition(definitionHolder, this.registry);
                }
            }
        }
        return beanDefinitions;
    }

    // ...
}
类路径 Bean 定义扫描器 ClassPathBeanDefinitionScanner 主要通过 findCandidateComponents() 方法调用其父类 ClassPathScanningCandidateComponentProvider 类来扫描获取给定包及其子包下的类。
2)、ClassPathScanningCandidateComponentProvider 扫描给定包及其子包的类
ClassPathScanningCandidateComponentProvider 类的 findCandidateComponents()方法具体实现扫描给定类路径包的功能,主要源码如下:
public class ClassPathScanningCandidateComponentProvider implements EnvironmentCapable, ResourceLoaderAware {

    //保存过滤规则要包含的注解,即 Spring 默认的@Component、@Repository、@Service、
    //@Controller 注解的 Bean,以及 JavaEE6 的@ManagedBean 和 JSR-330 的@Named 注解
    private final List<TypeFilter> includeFilters = new LinkedList<>();

    //保存过滤规则要排除的注解
    private final List<TypeFilter> excludeFilters = new LinkedList<>();

    //构造方法,该方法在子类 ClassPathBeanDefinitionScanner 的构造方法中被调用
    public ClassPathScanningCandidateComponentProvider(boolean useDefaultFilters) {
        this(useDefaultFilters, new StandardEnvironment());
    }

    public ClassPathScanningCandidateComponentProvider(boolean useDefaultFilters, Environment environment) {
        //如果使用 Spring 默认的过滤规则,则向容器注册过滤规则
        if (useDefaultFilters) {
            registerDefaultFilters();
        }
        setEnvironment(environment);
        setResourceLoader(null);
    }

    //向容器注册过滤规则
    @SuppressWarnings("unchecked")
    protected void registerDefaultFilters() {
        //向要包含的过滤规则中添加@Component 注解类,注意 Spring 中@Repository
        //@Service 和@Controller 都是 Component,因为这些注解都添加了@Component 注解
        this.includeFilters.add(new AnnotationTypeFilter(Component.class));
        //获取当前类的类加载器
        ClassLoader cl = ClassPathScanningCandidateComponentProvider.class.getClassLoader();
        try {
            //向要包含的过滤规则添加 JavaEE6 的@ManagedBean 注解
            this.includeFilters.add(new AnnotationTypeFilter(
                ((Class<? extends Annotation>) ClassUtils.forName("javax.annotation.ManagedBean", cl)), false));
            logger.debug("JSR-250 'javax.annotation.ManagedBean' found and supported for component scanning");
        }
        catch (ClassNotFoundException ex) {
            // JSR-250 1.1 API (as included in Java EE 6) not available - simply skip.
        }
        try {
            //向要包含的过滤规则添加@Named 注解
            this.includeFilters.add(new AnnotationTypeFilter(
                ((Class<? extends Annotation>) ClassUtils.forName("javax.inject.Named", cl)), false));
            logger.debug("JSR-330 'javax.inject.Named' annotation found and supported for component scanning");
        } catch (ClassNotFoundException ex) {
            // JSR-330 API not available - simply skip.
        }
    }

    //扫描给定类路径的包
    public Set<BeanDefinition> findCandidateComponents(String basePackage) {
        if (this.componentsIndex != null && indexSupportsIncludeFilters()) {
            return addCandidateComponentsFromIndex(this.componentsIndex, basePackage);
        } else {
            return scanCandidateComponents(basePackage);
        }

    }

    private Set<BeanDefinition> addCandidateComponentsFromIndex(CandidateComponentsIndex index, String basePackage) {
        //创建存储扫描到的类的集合
        Set<BeanDefinition> candidates = new LinkedHashSet<>();
        try {
            Set<String> types = new HashSet<>();
            for (TypeFilter filter : this.includeFilters) {
                String stereotype = extractStereotype(filter);
                if (stereotype == null) {
                    throw new IllegalArgumentException("Failed to extract stereotype from "+ filter);
                }
                types.addAll(index.getCandidateTypes(basePackage, stereotype));
            }
            boolean traceEnabled = logger.isTraceEnabled();
            boolean debugEnabled = logger.isDebugEnabled();
            for (String type : types) {
                //为指定资源获取元数据读取器,元信息读取器通过汇编(ASM)读//取资源元信息
                MetadataReader metadataReader = getMetadataReaderFactory().getMetadataReader(type);
                //如果扫描到的类符合容器配置的过滤规则
                if (isCandidateComponent(metadataReader)) {
                    //通过汇编(ASM)读取资源字节码中的 Bean 定义元信息
                    AnnotatedGenericBeanDefinition sbd = new AnnotatedGenericBeanDefinition(
                        metadataReader.getAnnotationMetadata());
                    if (isCandidateComponent(sbd)) {
                        if (debugEnabled) {
                            logger.debug("Using candidate component class from index: " + type);
                        }
                        candidates.add(sbd);
                    }
                    else {
                        if (debugEnabled) {
                            logger.debug("Ignored because not a concrete top-level class: " + type);
                        }
                    }
                } else {
                    if (traceEnabled) {
                        logger.trace("Ignored because matching an exclude filter: " + type);
                    }
                }
            }
        } catch (IOException ex) {
            throw new BeanDefinitionStoreException("I/O failure during classpath scanning", ex);
        }
        return candidates;

    }

    //判断元信息读取器读取的类是否符合容器定义的注解过滤规则
    protected boolean isCandidateComponent(MetadataReader metadataReader) throws IOException {
        //如果读取的类的注解在排除注解过滤规则中,返回 false
        for (TypeFilter tf : this.excludeFilters) {
            if (tf.match(metadataReader, getMetadataReaderFactory())) {
                return false;
            }
        }
        //如果读取的类的注解在包含的注解的过滤规则中,则返回 ture
        for (TypeFilter tf : this.includeFilters) {
            if (tf.match(metadataReader, getMetadataReaderFactory())) {
                return isConditionMatch(metadataReader);
            }
        }
        //如果读取的类的注解既不在排除规则,也不在包含规则中,则返回 false
        return false;
    }
}
注册注解 BeanDefinition
AnnotationConfigWebApplicationContext 是 AnnotationConfigApplicationContext 的 Web 版,它们对于注解 Bean 的注册和扫描是基本相同的,但是 AnnotationConfigWebApplicationContext 对注解 Bean 定义的载入稍有不同,AnnotationConfigWebApplicationContext 注入注解 Bean 定义
源码如下:
//载入注解 Bean 定义资源
@Override
protected void loadBeanDefinitions(DefaultListableBeanFactory beanFactory) {
    //为容器设置注解 Bean 定义读取器
    AnnotatedBeanDefinitionReader reader = getAnnotatedBeanDefinitionReader(beanFactory);
    //为容器设置类路径 Bean 定义扫描器
    ClassPathBeanDefinitionScanner scanner = getClassPathBeanDefinitionScanner(beanFactory);
    //获取容器的 Bean 名称生成器
    BeanNameGenerator beanNameGenerator = getBeanNameGenerator();
    //为注解 Bean 定义读取器和类路径扫描器设置 Bean 名称生成器
    if (beanNameGenerator != null) {
        reader.setBeanNameGenerator(beanNameGenerator);
        scanner.setBeanNameGenerator(beanNameGenerator);
        beanFactory.registerSingleton(AnnotationConfigUtils.CONFIGURATION_BEAN_NAME_GENERATOR, beanNameGenerator);
    }

    //获取容器的作用域元信息解析器
    ScopeMetadataResolver scopeMetadataResolver = getScopeMetadataResolver();
    //为注解 Bean 定义读取器和类路径扫描器设置作用域元信息解析器
    if (scopeMetadataResolver != null) {
        reader.setScopeMetadataResolver(scopeMetadataResolver);
        scanner.setScopeMetadataResolver(scopeMetadataResolver);
    }

    if (!this.annotatedClasses.isEmpty()) {
        if (logger.isInfoEnabled()) {
            logger.info("Registering annotated classes: [" + StringUtils.collectionToCommaDelimitedString(this.annotatedClasses) + "]");
        }
        reader.register(this.annotatedClasses.toArray(new Class<?>[this.annotatedClasses.size()]));
    }

    if (!this.basePackages.isEmpty()) {
        if (logger.isInfoEnabled()) {
            logger.info("Scanning base packages: [" + StringUtils.collectionToCommaDelimitedString(this.basePackages) + "]");
        }
        scanner.scan(this.basePackages.toArray(new String[this.basePackages.size()]));
    }

    //获取容器定义的 Bean 定义资源路径
    String[] configLocations = getConfigLocations();
    //如果定位的 Bean 定义资源路径不为空
    if (configLocations != null) {
        for (String configLocation : configLocations) {
            try {
                //使用当前容器的类加载器加载定位路径的字节码类文件
                Class<?> clazz = ClassUtils.forName(configLocation, getClassLoader());
                if (logger.isInfoEnabled()) {
                    logger.info("Successfully resolved class for [" + configLocation + "]");
                }
                reader.register(clazz);

            } catch (ClassNotFoundException ex) {
                if (logger.isDebugEnabled()) {
                    logger.debug("Could not load class for config location [" + configLocation + "] - trying package scan. " + ex);
                }
                //如果容器类加载器加载定义路径的 Bean 定义资源失败
                //则启用容器类路径扫描器扫描给定路径包及其子包中的类
                int count = scanner.scan(configLocation);
                if (logger.isInfoEnabled()) {
                    if (count == 0) {
                        logger.info("No annotated classes found for specified class/package [" + configLocation + "]");
                    } else {
                        logger.info("Found " + count + " annotated classes in package [" + configLocation + "]");
                    }
                }
            }
        }
    }
}
以上就是解析和注入注解配置资源的全过程分析。
IOC 容器初始化小结
现在通过上面的代码,总结一下 IOC 容器初始化的基本步骤:
- 初始化的入口在容器实现中的 refresh()调用来完成。
- 对 Bean 定义载入 IOC 容器使用的方法是 loadBeanDefinition(),
其中的大致过程如下:通过 ResourceLoader 来完成资源文件位置的定位,DefaultResourceLoader 是默认的实现,同时上下文本身就给出了 ResourceLoader 的实现,可以从类路径,文件系统,URL 等方式来定为资源位置。如果是 XmlBeanFactory 作为 IOC 容器,那么需要为它指定 Bean 定义的资源,也就是说Bean定义文件时通过抽象成Resource来被IOC容器处理的,容器通过 BeanDefinitionReader 来完成定义信息的解析和Bean信息的注册,往往使用的是 XmlBeanDefinitionReader 来解析Bean的XML定义文件-实际的处理过程是委托给 BeanDefinitionParserDelegate 来完成的,从而得到 bean 的定义信息,这些信息在 Spring 中使用 BeanDefinition对象来表示-这个名字可以让我们想到loadBeanDefinition(),registerBeanDefinition() 这些相关方法。它们都是为处理 BeanDefinition 服务的,容器解析得到 BeanDefinition 以后,需要把它在 IOC 容器中注册,这由 IOC 实现 BeanDefinitionRegistry 接口来实现。注册过程就是在 IOC 容器内部维护的一个 HashMap 来保存得到的 BeanDefinition 的过程。这个 HashMap 是 IOC 容器持有 Bean 信息的场所,以后对 Bean 的操作都是围绕这个 HashMap 来实现的。
然后我们就可以通过 BeanFactory 和 ApplicationContext 来享受到 Spring IOC 的服务了,在使用 IOC 容器的时候,我们注意到除了少量粘合代码,绝大多数以正确 IOC 风格编写的应用程序代码完全不用关心如何到达工厂,因为容器将把这些对象与容器管理的其他对象钩在一起。基本的策略是把工厂放到已知的地方,最好是放在对预期使用的上下文有意义的地方,以及代码将实际需要访问工厂的地方。Spring 本身提供了对声明式载入web应用程序用法的应用程序上下文,并将其存储在 ServletContext 中的框架实现。
以下是容器初始化全过程的时序图: